Introduction to Turkey Sliders on Hawaiian Rolls
Hey there, fellow home cooks! Are you ever in that “what’s for dinner?” or “what can I whip up for this impromptu gathering?” kind of panic? I totally get it.
That’s why I’m so thrilled to share my go-to recipe for turkey sliders on Hawaiian rolls. They’re a lifesaver, honestly.
This recipe is your secret weapon. It’s a quick solution for a busy day. It’s also a dish that will impress your loved ones.
Seriously, these little sandwiches are magic. They’re packed with flavor and ridiculously easy to make. They’re perfect for game nights or just a fun family dinner.
The Perfect Solution for Busy Lives
Life gets hectic, right? Between work, errands, and family commitments, finding time to cook a decent meal feels like a juggling act.
These turkey sliders on Hawaiian rolls are a game-changer for busy schedules. They come together in a flash.
They are a truly satisfying option. You get deliciousness without the fuss.
You can even prep some components ahead. This makes weeknight dinners a breeze. They’re a guaranteed hit every single time.
Why You’ll Love This Turkey Sliders on Hawaiian Rolls
These little flavor bombs are a true kitchen win. They are incredibly simple to assemble.
You’ll be amazed at how fast they come together. They are perfect for any occasion.
Flavorful, Fast, and Family-Approved
Get ready for a taste sensation. These sliders are incredibly delicious. They are packed with savory turkey and melty cheese.
The sweet Hawaiian rolls are a perfect match. They are truly family-approved. Everyone will ask for seconds!
Ingredients for Turkey Sliders on Hawaiian Rolls
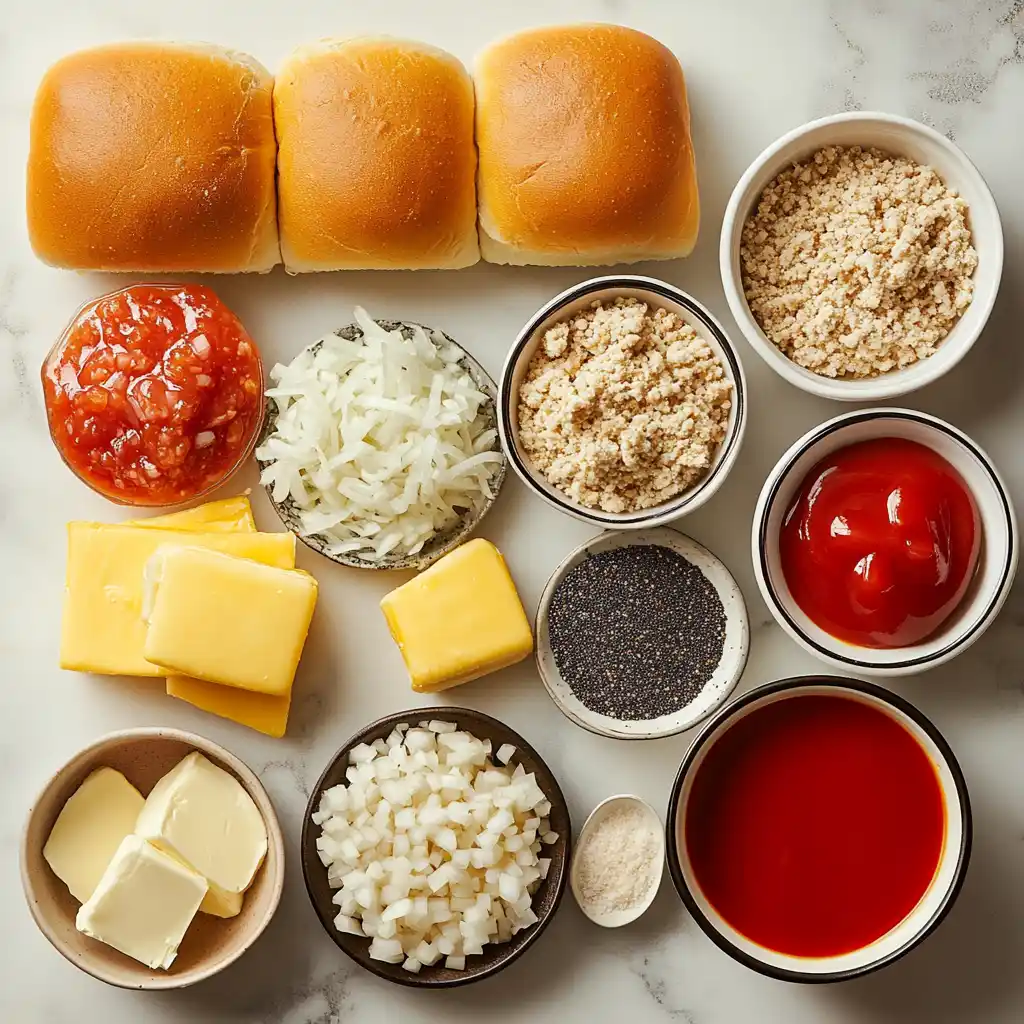
Let’s talk about what goes into these amazing turkey sliders on Hawaiian rolls. You’ll find these ingredients are pretty common. They make assembling these sliders a breeze.
The full list with exact amounts is at the bottom. You can easily print it out. Don’t worry, we’ll keep this section simple.
The Heart of the Slider: Ground Turkey
We start with ground turkey. It’s a lean protein. It forms the savory base of our mini burgers.
You can also use ground chicken. Both work wonderfully. Choose what you have on hand.
Binding and Flavor Boosters
To hold our turkey together, we use breadcrumbs and an egg. These are classic binders. They ensure nice, firm patties.
Then we add flavor! Onion gives a little bite. Ketchup adds sweetness. Worcestershire sauce brings umami depth. Garlic powder and simple salt and pepper round it out.
The Sweet Embrace: Hawaiian Rolls
Ah, the star! Hawaiian sweet rolls are key. Their soft, buttery texture is heavenly. They are a perfect size for sliders too.
Their subtle sweetness balances the savory turkey. They truly make these sliders special. You can usually find them in the bakery aisle.
Melty Goodness: Cheese Selection
Next up is cheese. Provolone is my top pick here. It melts beautifully. It has a mild, creamy flavor.
But don’t stop there! Cheddar or Swiss are also fantastic. They offer different flavor profiles. Pick your favorite!
The Irresistible Glaze
This is the secret weapon. We make a simple glaze. It’s a mix of melted butter and seasonings. Dijon mustard adds a tangy kick. Poppy seeds add a little texture. A touch more Worcestershire ties it all together.
This glaze bakes right into the rolls. It makes them golden and irresistible. Trust me on this one!
How to Make Turkey Sliders on Hawaiian Rolls
Now for the fun part: making these delicious turkey sliders on Hawaiian rolls! It’s easier than you think. We’ll walk through it step-by-step. Get ready for some mini sandwich magic.
Follow along, and you’ll have a batch ready in no time. These steps are super simple. They are designed for busy cooks like us.
Step 1: Prepare Your Oven and Pan
First things first, let’s get the oven ready. Preheat it to 375°F (190°C). This ensures it’s nice and hot.
Next, grab a baking sheet. Grease it lightly. This stops our sliders from sticking. You can use cooking spray or a little oil.
Step 2: Crafting the Perfect Turkey Patty Mixture
In a medium bowl, combine your ingredients. Put in the ground turkey. Add the finely chopped onion. Toss in the breadcrumbs and the beaten egg.
Now, add the ketchup and Worcestershire sauce. Sprinkle in the garlic powder, salt, and pepper. Mix everything gently but thoroughly. You want it well combined.
Step 3: Shaping the Mini Patties
Time to form the patties! Take your turkey mixture. Divide it into 12 equal portions. Roll each portion into a ball.
Then, flatten each ball into a small patty. Aim for a size that matches your Hawaiian rolls. This makes them perfect mini burgers.
Step 4: Cooking the Turkey Patties
Heat a lightly oiled skillet over medium heat. Carefully place your turkey patties in the skillet. Cook them for about 3-4 minutes per side.
You’re looking for a nice golden-brown color. Make sure they are cooked all the way through. Drain off any extra grease afterward.
Step 5: Whisking Together the Luscious Glaze
While the patties are cooking, let’s make the glaze. In a small bowl, whisk together ingredients. Start with the melted butter. Add the poppy seeds and Dijon mustard.
Pour in the remaining Worcestershire sauce. Whisk until it’s all nicely combined. This glaze is pure flavor!
Step 6: Assembling the Slider Base
Now, let’s build these beauties. Arrange the bottom halves of your Hawaiian rolls. Place them on your prepared baking sheet. This is where the magic starts.
Make sure they are laid out neatly. This makes assembly a breeze. They are ready for their delicious topping.
Step 7: Layering the Cooked Patties
Take your cooked turkey patties. Place one patty onto each bottom roll half. Center them nicely. This creates the foundation of your slider.
They should sit snugly. This ensures a balanced bite. Soon they’ll be irresistible.
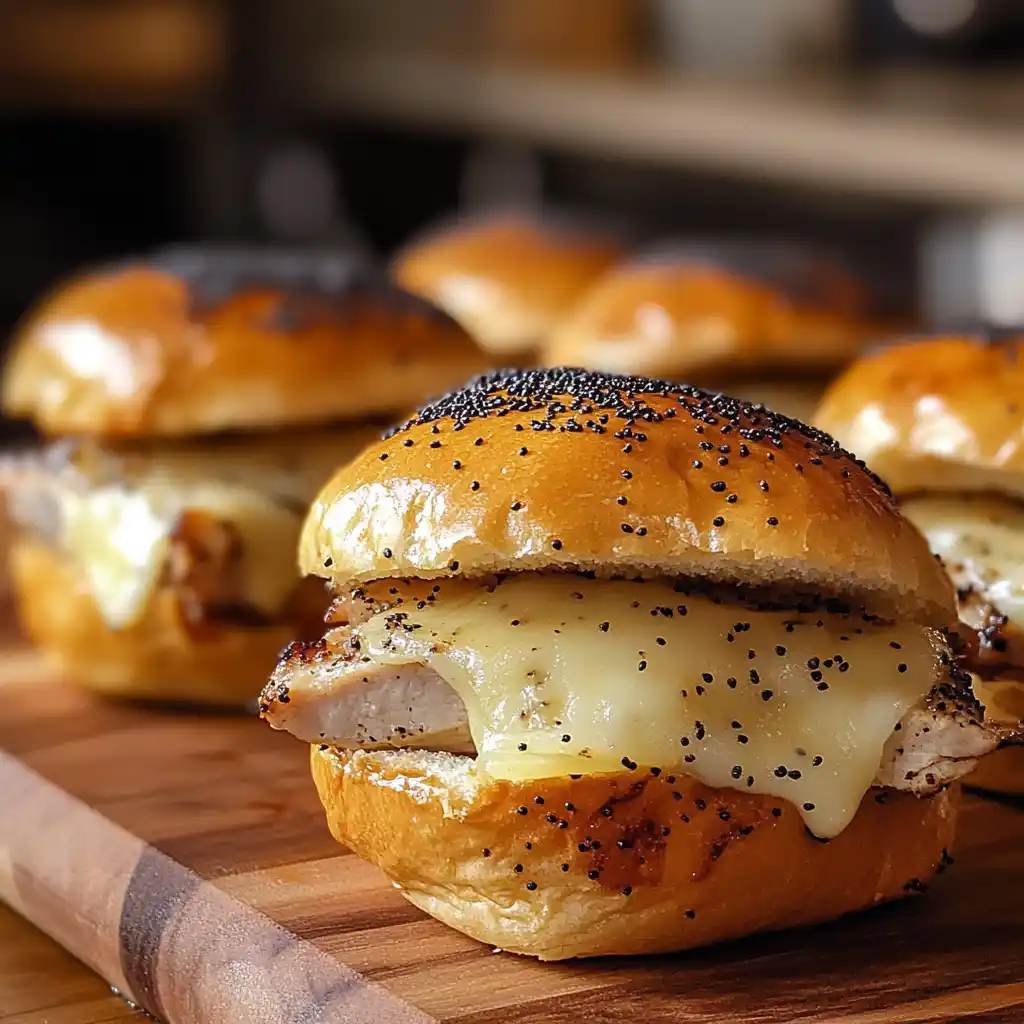
Step 8: Adding the Cheese for Meltiness
It’s cheese time! Place one slice of provolone cheese. Put it right on top of each turkey patty. This is crucial for that gooey factor.
As the sliders bake, the cheese melts. It becomes wonderfully gooey. It’s a melty, cheesy dream.
Step 9: Topping Off the Sliders
Now, grab the top halves of your Hawaiian rolls. Place them gently over the cheese. Make sure they cover the patties. This completes the sandwich structure.
They are almost ready for the oven. Just a little more love to add. This is the final assembly step.
Step 10: Brushing on the Flavorful Glaze
Grab that delicious glaze you made earlier. Using a pastry brush, generously brush the tops of the sliders. Make sure to cover them well.
This glaze adds so much flavor. It also gives them a beautiful golden hue. Don’t be shy with it!
Step 11: Baking to Golden Perfection
Pop the baking sheet into your preheated oven. Bake for about 10-12 minutes. You want the cheese to be fully melted. The rolls should be lightly golden brown.
Keep an eye on them. Baking time can vary slightly. The aroma will fill your kitchen. It’s heavenly!
Step 12: Serving Your Delicious Turkey Sliders
Once they’re out of the oven, let them cool slightly. They are best served warm. These turkey sliders on Hawaiian rolls are ready to enjoy. Serve them up to your happy crowd!
They make a fantastic appetizer or a light meal. Enjoy every delicious bite. You did it!
Tips for Success
Want your turkey sliders to be perfect? Here are a few tricks I’ve learned.
- Don’t overmix the turkey. It can make patties tough.
- Make sure your patties are uniform in size. They cook evenly this way.
- Keep an eye on the oven. Rolls can brown quickly.
- Toast the rolls slightly if you like them crispier.
- Use fresh ingredients for the best flavor.
Equipment Needed
You don’t need fancy gadgets for these sliders.
- Medium bowl for mixing.
- Skillet for cooking patties.
- Baking sheet for assembly.
- Small bowl for the glaze.
- Pastry brush for glazing.
- Measuring cups and spoons.
Variations for Your Turkey Sliders on Hawaiian Rolls
These turkey sliders are wonderfully versatile. Feel free to get creative with them! Personalize them to your tastes.
They are a great base for many delicious twists. You can adapt them easily. Here are some ideas to get you started.
Spice It Up!
Want a little heat? Add a pinch of red pepper flakes. Mix them right into the turkey mixture. A dash of hot sauce in the glaze also works. It’s a small change with big flavor.
This adds a lovely warmth. It’s perfect for those who like a little kick. Adjust the amount to your spice preference.
Cheese Swap Ideas
Provolone is great, but don’t stop there! Try cheddar for a sharper taste. Swiss cheese offers a nutty flavor. Monterey Jack melts beautifully. Pepper Jack adds some spice too. Experiment with your favorites!
Each cheese brings a different character. It changes the slider’s profile subtly. Find your perfect cheesy match.
Going Gluten-Free
Need a gluten-free option? Look for gluten-free slider buns. They work just as well. Ensure your breadcrumbs are also gluten-free. The rest of the recipe is naturally gluten-free.
This makes them accessible to more people. Enjoy these tasty sliders without worry. Everyone can join the fun.
Adding Extra Veggies
Boost the nutrition! Finely grate some zucchini. Squeeze out the excess moisture. Mix it into the turkey. You can also add finely chopped bell peppers. They add color and crunch.
This is a sneaky way to get more veggies in. Your family might not even notice! It adds great texture too.
Serving Suggestions for Turkey Sliders on Hawaiian Rolls
These turkey sliders on Hawaiian rolls are perfect for any occasion. They are great as a main dish or appetizer.
Serve them with your favorite sides. They pair well with many things. Here are some ideas:
- Crispy sweet potato fries.
- A fresh, crisp green salad.
- Creamy coleslaw.
- A side of baked beans.
- Watermelon slices on a hot day.
- Serve with iced tea or lemonade.
FAQs about Turkey Sliders on Hawaiian Rolls
Got questions about these yummy turkey sliders on Hawaiian rolls? I’ve got answers! Let’s tackle some common queries. This helps you make them perfectly.
These answers should clear things up. They ensure your slider-making success. Let’s dive in!
Can I make these turkey sliders ahead of time?
Yes, you absolutely can! Prepare the turkey mixture. Form the patties. Cook them. Let them cool completely. Store them in an airtight container. Refrigerate for up to 2 days. Assemble and bake when ready to serve. This saves so much time!
Reheating is simple. Just pop them in the oven. They’ll be just as delicious. This is a lifesaver for busy hosts.
What kind of cheese works best for these sliders?
Provolone is fantastic. It melts so smoothly. Cheddar cheese is another great choice. It offers a sharper flavor. Swiss cheese provides a nutty taste. Monterey Jack is also a winner. It melts beautifully and is mild. Choose your personal favorite!
The key is a good melting cheese. This creates that irresistible gooeyness. It truly elevates the sliders. Don’t be afraid to experiment!
Are these sliders suitable for a party or just a quick meal?
Oh, they’re perfect for both! These turkey sliders on Hawaiian rolls are ideal party food. They are easy to eat standing up. They are also a fantastic quick meal option. They satisfy hunger fast. You can whip them up any night of the week. They are incredibly versatile.
Their small size makes them great for appetizers. They are also substantial enough for a light lunch. They are a true crowd-pleaser. Everyone loves them!
Can I use different types of bread instead of Hawaiian rolls?
While Hawaiian rolls are special, you can use other breads. Consider small brioche buns. Dinner rolls also work well. Even mini croissants could be interesting. Just ensure they are slider-sized. They need to fit the patties.
The sweetness of Hawaiian rolls is unique. But other soft rolls can still be delicious. This offers flexibility. Adjust as needed for your pantry. Enjoy your sliders!
Final Thoughts
There you have it! These turkey sliders on Hawaiian rolls are more than just a recipe. They’re a little bit of joy. They’re a shortcut to happy faces. They bring delicious simplicity to your table.
I hope you feel inspired to try them. They are perfect for busy weeknights. They also shine at gatherings. You’ll love how easy they are. You’ll adore how much everyone enjoys them.
So next time you need a quick win. Or if you just want a tasty treat. Reach for this recipe. It’s a keeper, trust me. Happy cooking!
PrintTurkey Sliders on Hawaiian Rolls: Deliciously Easy!
- Total Time: 45 minutes
- Yield: 12 sliders
- Diet: None
Description
These turkey sliders on Hawaiian rolls are a crowd-pleasing appetizer or quick meal. They’re incredibly easy to make and packed with flavor, featuring savory turkey, melted cheese, and a sweet and tangy sauce, all nestled in soft, buttery Hawaiian rolls.
Ingredients
- 1 pound ground turkey
- 1/2 cup finely chopped onion
- 1/4 cup breadcrumbs
- 1 egg, lightly beaten
- 1/4 cup ketchup
- 1 tablespoon Worcestershire sauce
- 1 teaspoon garlic powder
- 1/2 teaspoon salt
- 1/4 teaspoon black pepper
- 12 Hawaiian sweet rolls, split horizontally
- 12 slices provolone cheese
- 1/4 cup melted butter
- 1 tablespoon poppy seeds
- 1 teaspoon Dijon mustard
- 1 teaspoon Worcestershire sauce
Instructions
- Preheat oven to 375°F (190°C). Grease a baking sheet.
- In a medium bowl, combine ground turkey, chopped onion, breadcrumbs, egg, ketchup, 1 tablespoon Worcestershire sauce, garlic powder, salt, and pepper. Mix well.
- Form the turkey mixture into 12 small patties, about the size of the Hawaiian rolls.
- Cook the turkey patties in a lightly oiled skillet over medium heat until browned and cooked through, about 3-4 minutes per side. Drain any excess grease.
- While the patties are cooking, whisk together the melted butter, poppy seeds, Dijon mustard, and 1 teaspoon Worcestershire sauce in a small bowl.
- Arrange the bottom halves of the Hawaiian rolls on the prepared baking sheet.
- Place one cooked turkey patty on each bottom roll half.
- Top each patty with a slice of provolone cheese.
- Place the top halves of the rolls over the cheese.
- Brush the tops of the sliders generously with the butter mixture.
- Bake for 10-12 minutes, or until the cheese is melted and the rolls are lightly golden brown.
- Serve warm.
Notes
- You can substitute cheddar cheese or Swiss cheese for provolone if desired.
- For a spicier kick, add a pinch of red pepper flakes to the turkey mixture.
- These sliders can be made ahead of time and reheated before serving.
- Prep Time: 20 minutes
- Cook Time: 25 minutes
- Category: Appetizer/Main Course
- Method: Baking
- Cuisine: American