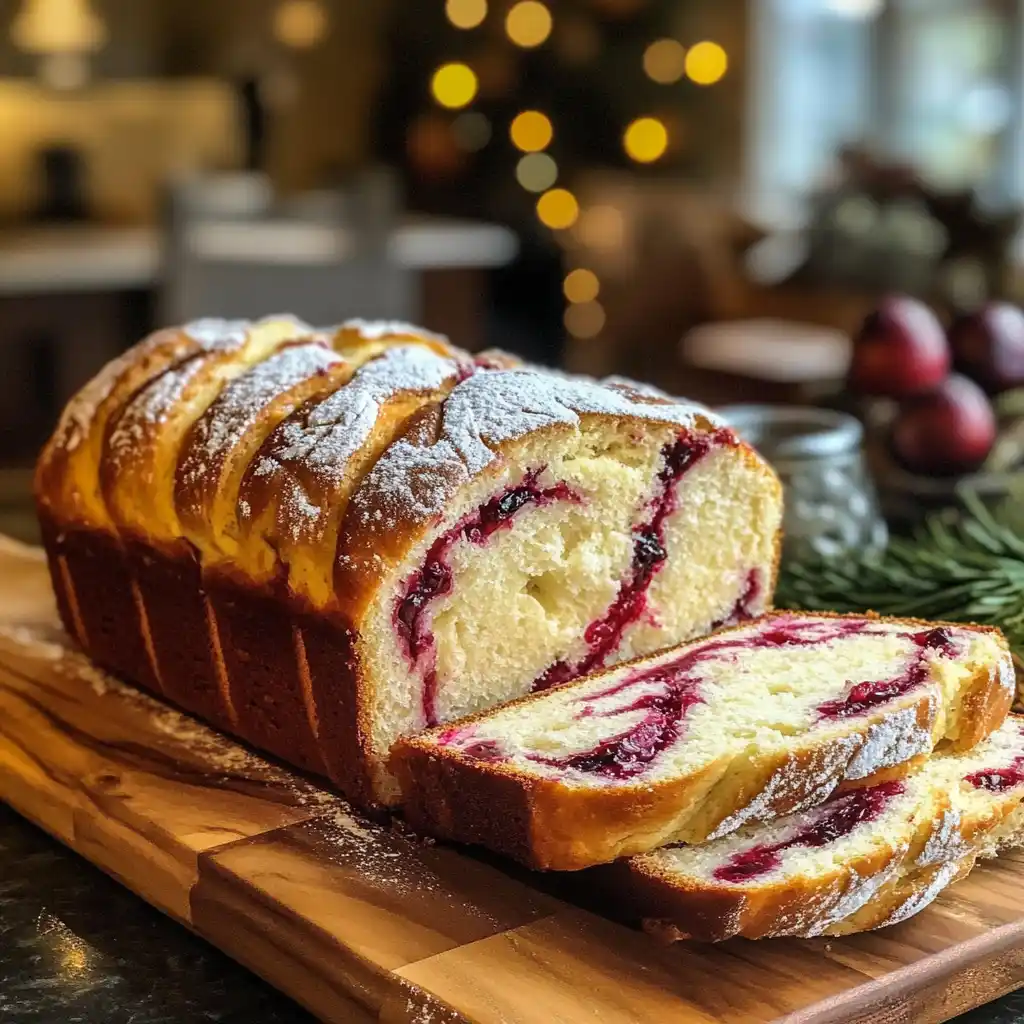
Introduction to Swirled Garlic Herb Bread
Hey there, fellow home cooks! Are you ever in need of a showstopper side dish? Something that smells amazing while it bakes?
Well, I’ve got just the thing for you. My Swirled Garlic Herb Bread is a game-changer. It looks so fancy, but honestly, it’s surprisingly simple to whip up.
Imagine this: warm, fragrant bread with ribbons of garlic and herbs woven throughout. It’s perfect for family dinners or when friends pop over unexpectedly.
This recipe is a lifesaver on busy weeknights. Plus, the aroma filling your kitchen? Pure bliss. It really makes any meal feel special.
This Swirled Garlic Herb Bread is incredibly easy. You don’t need to be a master baker.
It comes together surprisingly fast. The delightful aroma is a bonus.
Plus, the taste is simply divine. It’s a perfect balance of savory garlic and fresh herbs.
It will truly impress your family and friends. This homemade bread is a winner.
Ingredients for Swirled Garlic Herb Bread
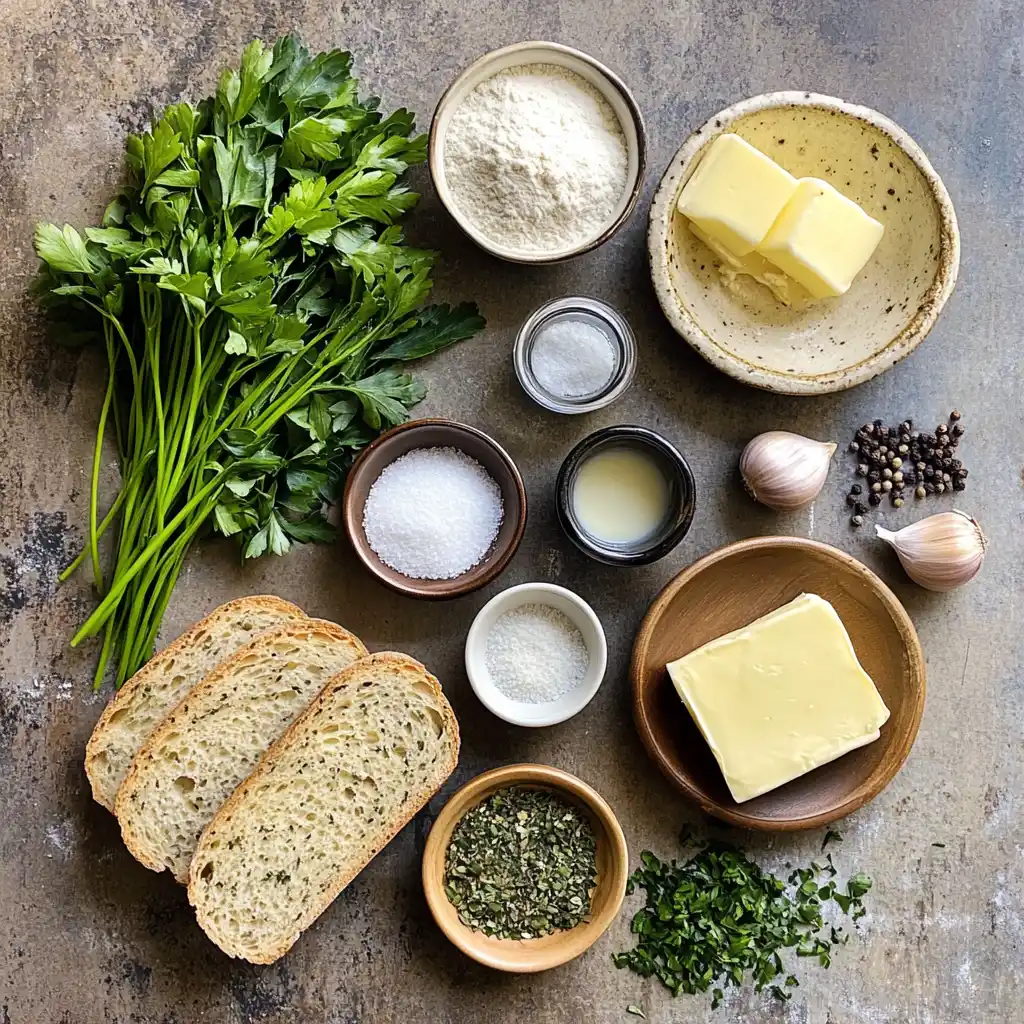
Gathering your ingredients is the first step. It’s like collecting treasures for our culinary adventure.
Don’t worry about exact amounts here; they’re all listed below for you. We’ll focus on what each key player brings to our Swirled Garlic Herb Bread.
Yeast
This is our magic worker. Yeast gives our bread its lovely rise.
It’s a tiny organism that eats and makes bubbles. Use active dry yeast for this recipe.
Sugar
Just a touch of sweetness. Sugar feeds the yeast.
It helps our bread get that beautiful golden crust. Granulated sugar works perfectly.
Warm Water
This is the cozy bath for our yeast. Make sure it’s warm, not hot.
Too hot, and it shocks the yeast. Too cool, and it won’t wake up.
All-Purpose Flour
The foundation of our loaf. All-purpose flour is versatile.
It gives our bread structure. Keep some extra flour handy for dusting.
Salt
Salt is a flavor enhancer. It balances the sweetness.
It also controls yeast activity. A little goes a long way.
Olive Oil
This adds richness to our dough. It also helps it stay soft.
Use a good quality extra virgin olive oil. It makes a difference.
Unsalted Butter
For our decadent garlic herb butter. Softened butter is key.
It spreads like a dream. Unsalted lets us control the saltiness.
Garlic
The star of our savory filling. Fresh minced garlic is best.
It gives that pungent, irresistible aroma. It’s the heart of our garlic bread.
Fresh Parsley
Adds a burst of freshness. Parsley brings a lovely green color.
It has a mild, peppery taste. Chop it finely for even distribution.
Fresh Chives
These offer a delicate oniony note. Chives are like mild green onions.
They add a subtle complexity. Use them generously for flavor.
Dried Oregano
A classic herb for bread. Oregano brings an earthy depth.
It complements the garlic beautifully. A little goes a long way.
Black Pepper
A pinch adds a little zing. It wakes up all the other flavors.
Freshly ground pepper is always superior. It adds a subtle bite.
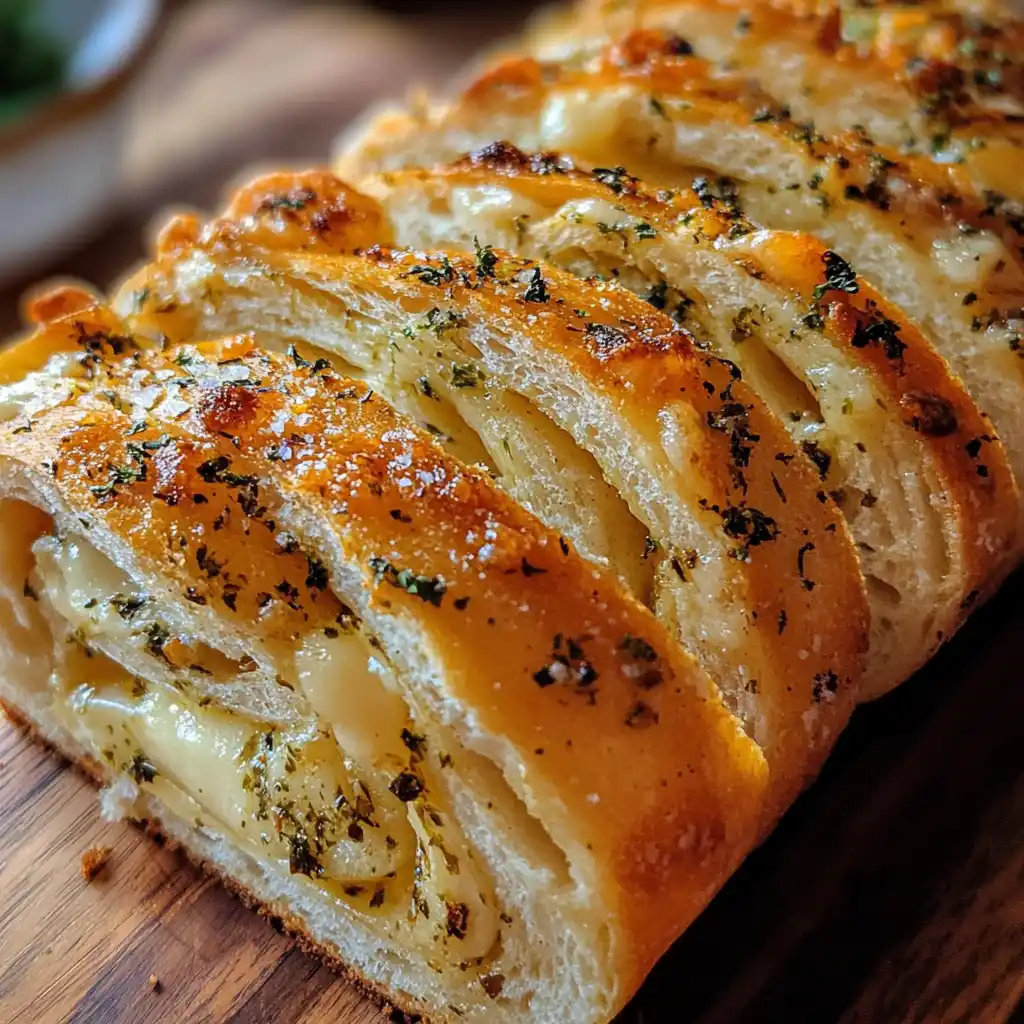
How to Make Swirled Garlic Herb Bread
Now for the fun part – creating our beautiful Swirled Garlic Herb Bread!
Follow these simple steps. You’ll have a masterpiece in no time.
Activate the Yeast
In a small bowl, dissolve yeast and sugar. Use warm water, about 105-115°F.
Let it sit for 5-10 minutes. You’ll see foam when it’s ready.
Combine Dry Ingredients
In a large bowl, whisk together your flour and salt. This ensures even distribution.
This is the base for our dough. It’s the start of our delicious homemade bread.
Form the Dough
Add the foamy yeast mixture and olive oil. Mix into the flour mixture.
It will look shaggy at first. Don’t worry, that’s perfectly normal.
Knead the Dough
Turn the dough onto a floured surface. Knead it for 8-10 minutes.
You want it smooth and elastic. This develops the gluten for a great texture.
First Rise
Place dough in an oiled bowl. Turn to coat it well.
Cover with plastic wrap. Let it rise in a warm spot for 1-1.5 hours.
It should double in size. This is a crucial step for airy bread.
Prepare the Garlic Herb Butter
While the dough rises, mix your filling. Combine softened butter with garlic.
Add parsley, chives, oregano, and pepper. Mix until well combined.
This fragrant butter is the heart of our Swirled Garlic Herb Bread. It’s pure flavor magic.
Shape the Swirled Loaf
Punch down the risen dough. Roll it into a 10×12 inch rectangle.
Spread the garlic herb butter evenly. Leave a small border on one long side.
Starting from the buttered edge, roll it up tightly. Pinch the seam to seal.
Cut the log in half lengthwise. Gently twist the two halves together.
Keep the cut sides facing up. Shape this into a round loaf.
Place it on parchment-lined baking sheet. This is where the artistry shows.
Second Rise
Cover the loaf loosely with plastic wrap. Let it rise again for 30-45 minutes.
It will get puffy. This second rise adds lightness.
Preheat Your Oven
Set your oven to 375°F (190°C). Let it get nice and hot.
A hot oven ensures a good crust. This is key for baking perfection.
Bake to Golden Perfection
Bake the Swirled Garlic Herb Bread for 25-30 minutes. You want it golden brown.
An internal temperature of 190°F is ideal. Use a thermometer if you have one.
Cool and Enjoy Your Swirled Garlic Herb Bread
Let the loaf cool on a wire rack. Resist the urge to cut it immediately!
Cooling allows the crumb to set. Then, slice and serve your amazing creation.
Tips for Success
- Always use warm, not hot, water for yeast. Too hot kills it.
- Don’t skip the kneading. It builds structure.
- A warm spot helps dough rise best.
- Shape gently to keep those lovely swirls.
- Let it cool before slicing. Patience pays off!
Equipment Needed
To create this Swirled Garlic Herb Bread, you’ll need a few basics.
Most kitchens have these on hand.
- Large mixing bowl (for dough)
- Small bowls (for yeast and butter)
- Measuring cups and spoons
- Baking sheet
- Parchment paper (optional, but helpful)
- Rolling pin (or a clean bottle)
- Sharp knife (for cutting the log)
- Wire rack (for cooling)
Variations for Swirled Garlic Herb Bread
Want to jazz up your Swirled Garlic Herb Bread? You’ve got options!
Here are some fun twists to try.
- Cheesy Delight: Add shredded Parmesan or cheddar to the butter mixture. It melts beautifully.
- Spicy Kick: Mix in a pinch of red pepper flakes or a dash of hot sauce. Perfect for heat lovers.
- Herb Swap: Use rosemary, thyme, or dill instead of or with the parsley and chives. Fresh is best!
- Garlic Boost: Roast the garlic cloves before mincing for a sweeter, milder flavor. It’s like a flavor upgrade.
- Vegan Option: Use a plant-based butter substitute and ensure your liquid is water. It still turns out delicious.
Serving Suggestions
This Swirled Garlic Herb Bread is incredibly versatile. It elevates any meal.
Here are a few ideas to get you started.
- Serve warm alongside soups or stews.
- It’s a fantastic appetizer with a side of marinara.
- Pair it with your favorite pasta dishes.
- Enjoy it simply with a drizzle of olive oil.
- A crisp green salad makes a perfect companion.
FAQs about Swirled Garlic Herb Bread
Can I make this Swirled Garlic Herb Bread ahead of time?
Yes, you absolutely can! After the first rise, cover the dough.
Refrigerate it overnight. Bring it to room temperature before shaping and baking.
What is the best way to store leftover Swirled Garlic Herb Bread?
Store cooled bread at room temperature. Use an airtight container or bag.
It stays fresh for a couple of days. Reheat slices in the oven or toaster.
Can I use dried herbs instead of fresh for my Swirled Garlic Herb Bread?
Definitely! Dried herbs work well.
Cut the amount of dried herbs in half. They are more potent than fresh ones.
My dough didn’t rise. What could have gone wrong?
This usually happens for a few reasons. Your water might have been too hot or too cold.
Old yeast can also lose its power. Check expiration dates and water temperature next time.
Final Thoughts
Baking this Swirled Garlic Herb Bread is more than just making food. It’s about filling your home with an irresistible aroma. It’s about the joy of creating something beautiful and delicious.
This loaf is a testament to simple ingredients transforming into something special. It’s proof that you don’t need hours in the kitchen for amazing results.
Whether it’s gracing your dinner table or being shared with friends, this bread brings smiles. It’s a little piece of edible comfort.
So go ahead, give this Swirled Garlic Herb Bread a try. Embrace the process. Enjoy every warm, garlicky bite. You’ve earned it!
PrintSwirled Garlic Herb Bread: Bake This Delicious Loaf!
- Total Time: 2 hours 20 minutes
- Yield: 1 loaf
- Diet: Vegetarian
Description
A visually appealing and flavorful swirled bread infused with garlic and herbs, perfect as a side dish or on its own.
Ingredients
- 1 teaspoon active dry yeast
- 1 teaspoon granulated sugar
- 1 cup warm water (105-115°F)
- 2 ½ cups all-purpose flour, plus more for dusting
- 1 teaspoon salt
- 2 tablespoons olive oil, plus more for greasing
- 1/4 cup unsalted butter, softened
- 2 cloves garlic, minced
- 2 tablespoons chopped fresh parsley
- 1 tablespoon chopped fresh chives
- 1 teaspoon dried oregano
- Pinch of black pepper
Instructions
- In a small bowl, dissolve yeast and sugar in warm water. Let stand for 5-10 minutes, or until foamy.
- In a large bowl, whisk together flour and salt.
- Add the yeast mixture and olive oil to the flour mixture. Mix until a shaggy dough forms.
- Turn the dough out onto a lightly floured surface and knead for 8-10 minutes, until smooth and elastic.
- Place the dough in a lightly oiled bowl, turning to coat. Cover with plastic wrap and let rise in a warm place for 1-1.5 hours, or until doubled in size.
- While the dough is rising, prepare the garlic herb butter: In a small bowl, combine softened butter, minced garlic, parsley, chives, oregano, and black pepper. Mix well.
- Once the dough has doubled, punch it down and turn it out onto a lightly floured surface.
- Roll the dough into a rectangle, about 10×12 inches.
- Spread the garlic herb butter evenly over the surface of the dough, leaving a small border on one of the long sides.
- Starting from the long side with the butter spread all the way to the edge, tightly roll up the dough into a log. Pinch the seam to seal.
- Cut the log in half lengthwise.
- Gently twist the two halves together, keeping the cut sides facing upwards.
- Carefully shape the twisted dough into a round loaf and place it on a baking sheet lined with parchment paper.
- Cover the loaf loosely with plastic wrap and let it rise for another 30-45 minutes.
- Preheat oven to 375°F (190°C).
- Bake for 25-30 minutes, or until golden brown and the internal temperature reaches 190°F (88°C).
- Let cool on a wire rack before slicing and serving.
Notes
- For a richer flavor, you can add a pinch of red pepper flakes to the garlic herb butter.
- If fresh herbs are not available, you can use dried herbs, but reduce the amount by half.
- Ensure the water is not too hot, as it can kill the yeast.
- The dough can be made ahead of time and refrigerated overnight after the first rise. Bring it to room temperature before shaping.
- Prep Time: 20 minutes
- Cook Time: 30 minutes
- Category: Bread
- Method: Baking
- Cuisine: American