Hey there, fellow home cooks! Are you ever in a pinch, needing a sweet treat that wows without the fuss? I totally get it. Life gets busy, right?
Well, I’ve got something truly special for you today: Peanut Butter Oreo Truffles. These little gems are pure magic. They’re like a flavor explosion in your mouth. Plus, they’re a fantastic way to impress guests. Or just treat yourself! You deserve it, after all.
This recipe is your secret weapon. It’s a quick fix for cravings. It’s also perfect for last-minute gatherings. You’ll be amazed how simple they are. Seriously, they’re a game-changer for busy days. Get ready for some delicious fun!
Why You’ll Love These Peanut Butter Oreo Truffles
These no-bake delights are a dream. They’re incredibly simple to whip up. Seriously, minimal effort yields maximum deliciousness. Get ready for a flavor combination that’s simply irresistible. They’re the perfect sweet escape.
You’ll adore how quickly they come together. Busy schedules welcome this treat. It’s a guaranteed crowd-pleaser, too. Your friends and family will beg for the recipe.
Ingredients for Peanut Butter Oreo Truffles
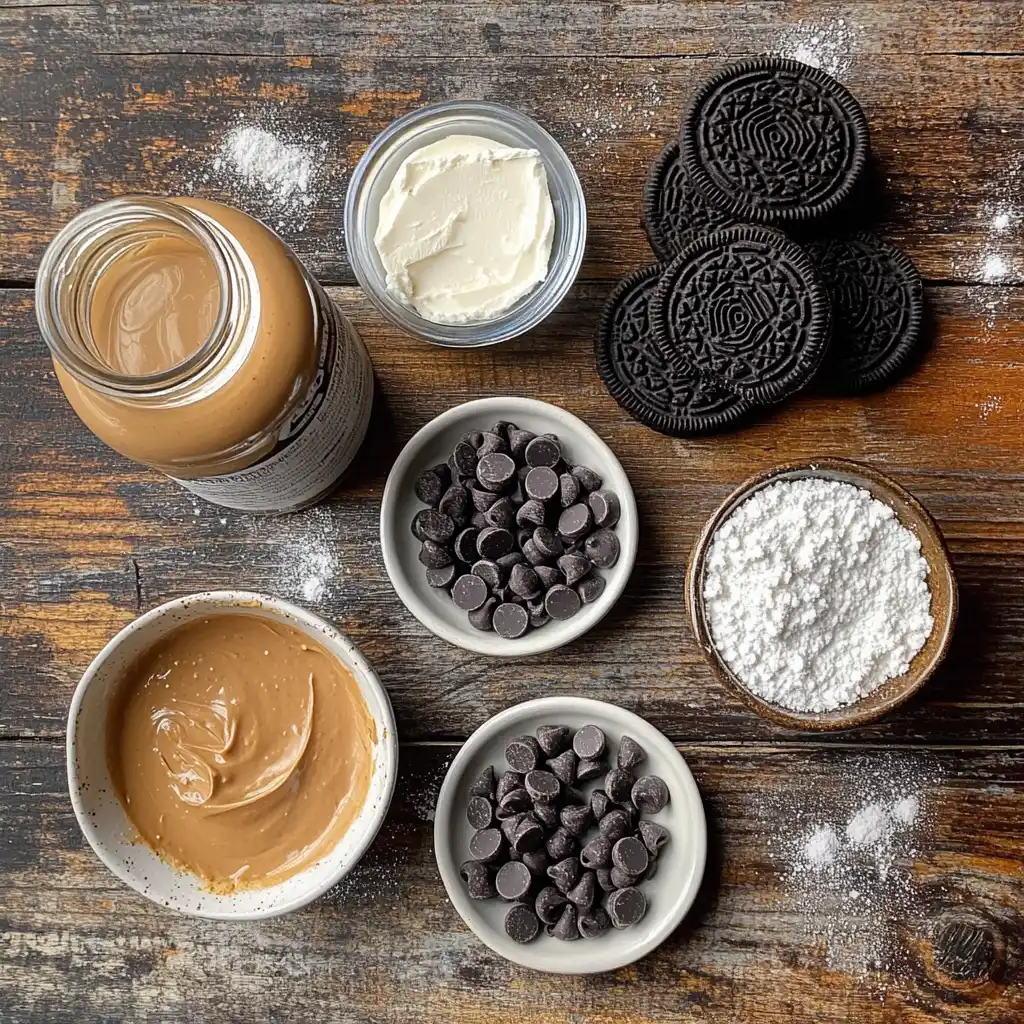
Gathering your ingredients is the first step. Think of it as assembling your flavor squad. You can find exact measurements at the bottom of this article. Don’t worry if you don’t have everything. I’ll share some easy swaps!
These simple components create something extraordinary. Let’s dive into what makes these truffles so special.
The Stars of the Show: Oreo Cookies
You’ll need those classic chocolate sandwich cookies. They form the crunchy base. Their dark, sweet flavor is essential. Any Oreo variety works here.
Crush them up nice and fine. This creates the cookie crumb foundation. It’s the heart of our truffle mixture.
The Creamy Binder: Peanut Butter
Creamy peanut butter is key. It brings a nutty richness. It also helps bind everything together. Use your favorite brand.
A smooth, luscious texture is the goal. It blends beautifully with the cookies. Plus, who doesn’t love peanut butter?
The Rich Foundation: Cream Cheese
Softened cream cheese adds a wonderful tang. It makes the truffle filling smooth. It also balances the sweetness perfectly.
Make sure it’s at room temperature. This helps it mix in easily. No lumps allowed in our smooth filling!
The Decadent Coating: Chocolate
You’ll need some good quality chocolate chips. Semi-sweet is my go-to choice. It complements the peanut butter well. Milk or dark chocolate also works great.
This coating is the final touch. It seals in all that goodness. It makes these treats look so professional.
Optional Enhancements
Want to add a little extra flair? Consider some optional additions. Chopped peanuts add a nice crunch. A sprinkle of sea salt can boost flavor.
These little extras elevate your truffles. They add texture and visual appeal. Get creative with your garnishes!
How to Make Peanut Butter Oreo Truffles
Now for the fun part! Making these delightful Peanut Butter Oreo Truffles is easier than you think. Follow these simple steps. You’ll have a batch of delicious treats in no time. Let’s get cooking!
Step 1: Create the Oreo Crumbles
First, let’s crush those Oreos. You want fine crumbs. A food processor works wonders here. Alternatively, place them in a zip-top bag. Bash them with a rolling pin.
Ensure there are no big chunks left. This creates a smooth base. It’s the foundation of our no-bake dessert.
Step 2: Combine the Truffle Base
In a medium bowl, mix your ingredients. Add the Oreo crumbs. Stir in the peanut butter next. Then, add the softened cream cheese.
Mix everything until it’s well combined. You want a uniform, dough-like consistency. It should hold together nicely.
Step 3: Shape Your Delicious Bites
Time to roll these beauties. Use a tablespoon of the mixture. Roll it between your palms. Aim for small balls, about an inch wide. They should be uniform in size.
Place these little orbs onto a baking sheet. Line it with parchment paper first. This prevents sticking later on.
Step 4: The Crucial Chill
Now, give them a good chill. Pop the baking sheet into the refrigerator. Let them firm up for at least 30 minutes. This step is really important.
Chilling helps the truffles hold their shape. It makes dipping them in chocolate much easier. Don’t skip this part!
Step 5: Melt the Chocolate Coating
While they chill, melt your chocolate. Use a microwave-safe bowl. Add the chocolate chips. If using, add the coconut oil now. It helps make the chocolate smooth.
Heat in 30-second intervals. Stir well after each interval. Continue until the chocolate is completely smooth. Be patient; don’t overheat it.
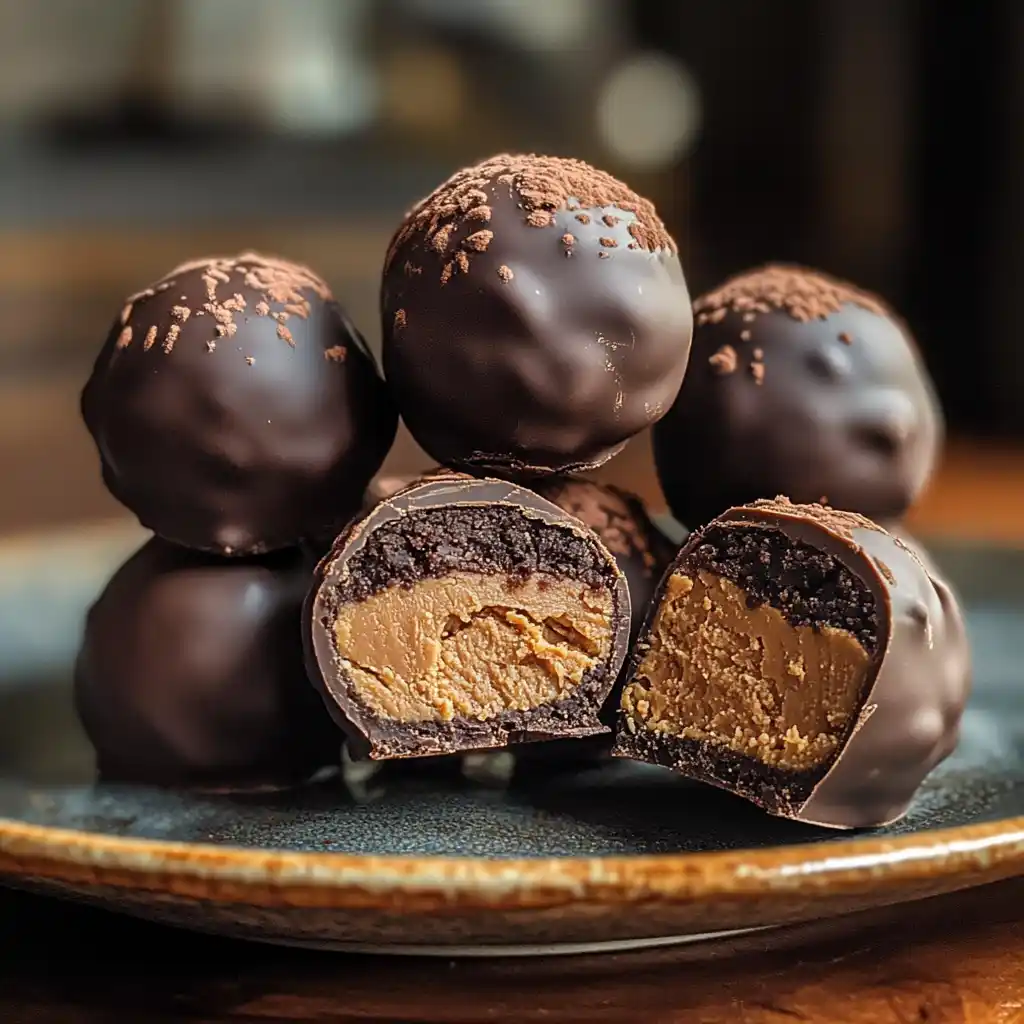
Step 6: Dip into Decadence
Retrieve your chilled truffle balls. Dip each one into the melted chocolate. Use a fork or a toothpick. Ensure it’s fully coated. Let any excess chocolate drip off.
This chocolate coating is pure bliss. It’s the perfect complement to the truffle. It makes these treats look so fancy.
Step 7: Final Presentation Prep
Place the coated truffles back onto the parchment paper. Make sure they have space between them. This prevents them from sticking together.
If you’re adding garnishes, do it now. Sprinkle chopped peanuts or extra Oreo crumbs. They stick best while the chocolate is still wet.
Step 8: The Final Set
Return the baking sheet to the fridge. Let the chocolate coating set completely. This usually takes another 20-30 minutes. They should feel firm to the touch.
And there you have it! Perfect Peanut Butter Oreo Truffles. Ready to be devoured. Enjoy your delicious creation!
Tips for Success with Peanut Butter Oreo Truffles
- Ensure cream cheese is truly softened.
- Chill truffles adequately before dipping.
- Use a fork for easy dipping.
- Let excess chocolate drip off.
- Garnish while chocolate is still wet.
- Store them properly for best results.
Equipment Needed for Making Peanut Butter Oreo Truffles
You won’t need a fancy setup for these. Basic kitchen tools will do the trick. Think of them as your trusty sidekicks.
Here’s what you’ll likely need. Many are probably already in your drawers!
- A food processor or zip-top bag and rolling pin for crushing cookies.
- A medium mixing bowl for combining ingredients.
- A baking sheet to hold your truffles.
- Parchment paper to prevent sticking.
- A microwave-safe bowl for melting chocolate.
- A fork or toothpick for dipping.
Delicious Variations for Peanut Butter Oreo Truffles
Want to switch things up? These Peanut Butter Oreo Truffles are super adaptable. Here are some fun ideas to try!
- Different Chocolate Coatings: Swap semi-sweet for milk chocolate or dark chocolate. White chocolate is also lovely!
- Add-Ins: Stir in a tablespoon of cocoa powder for a richer chocolate flavor. Mini chocolate chips or chopped nuts can add texture.
- Peanut Butter Twists: Try crunchy peanut butter for extra texture. Almond butter or cashew butter can offer a different nutty profile.
- Dietary Adaptations: Use gluten-free Oreos for a gluten-free option. For a dairy-free version, look for dairy-free cookies and use dairy-free chocolate chips.
- Flavor Boosters: A teaspoon of instant coffee granules in the melted chocolate can enhance its flavor. A dash of cinnamon adds warmth.
Serving Suggestions for Your Peanut Butter Oreo Truffles
These little bites are perfect for any occasion. They look beautiful on a dessert platter. Serve them at parties or potlucks. They’re a delightful ending to any meal.
Pair them with a glass of cold milk. Coffee or tea also makes a lovely accompaniment. Arrange them in colorful cupcake liners. They are sure to be a hit!
- Arrange on a festive dessert platter.
- Serve alongside a cold glass of milk.
- Offer them with coffee or tea.
- Place in decorative mini cupcake liners.
- Enjoy them as a standalone sweet treat.
FAQs about Peanut Butter Oreo Truffles
Got questions about these delightful Peanut Butter Oreo Truffles? I’ve got answers! Let’s tackle some common queries.
Making these ahead is a breeze. They actually taste even better the next day. This makes them perfect for busy schedules. Plan them a day or two in advance.
Can I make Peanut Butter Oreo Truffles ahead of time?
Absolutely! These little delights are fantastic for making ahead. I often prepare them a day or two before an event. The flavors meld beautifully. They store well, too. This makes them a stress-free option.
Proper storage keeps them tasting fresh. It also maintains their lovely texture. You want them to be perfect when served. Think of them as make-ahead magic.
What’s the best way to store these delicious truffles?
Store your finished Peanut Butter Oreo Truffles in an airtight container. Keep them in the refrigerator. This keeps the chocolate coating firm. It also prevents them from getting too soft. They’ll last for about a week this way.
If stacking them, place parchment paper between layers. This stops them from sticking. It keeps each truffle looking its best. Enjoy them chilled for a delightful crunch.
Are there any substitutions for the cream cheese in these truffles?
While cream cheese is traditional, there are options! Some people use softened butter for a richer taste. Others try mascarpone cheese for a milder flavor. You could also experiment with dairy-free cream cheese alternatives.
However, cream cheese adds a unique tang. It helps bind the mixture perfectly. Substitutions might alter the texture slightly. They can still be delicious, though!
How do I get a smooth chocolate coating on my truffles?
Melting chocolate properly is key. Use a double boiler or microwave in short bursts. Stir frequently to avoid scorching. Adding a teaspoon of coconut oil or vegetable shortening helps. It makes the chocolate smoother and shinier.
Ensure your chilled truffles are firm. This helps the chocolate adhere well. Work quickly once the chocolate is melted. A smooth coating makes these treats irresistible.
Final Thoughts on Peanut Butter Oreo Truffles
So there you have it! A truly delightful recipe. These Peanut Butter Oreo Truffles are more than just a treat. They’re a little slice of joy. They bring smiles to faces, big and small. You’ve created something special.
Think of the happy moments they’ll spark. They’re perfect for celebrations. They’re also great for simple, sweet evenings. You’ve made something delicious with your own hands. That’s a wonderful feeling, isn’t it?
Remember, cooking should be fun. It’s about sharing love. It’s about creating memories. These truffles embody that spirit. They are simple, satisfying, and utterly delicious. I hope you enjoy making and sharing them!
PrintPeanut Butter Oreo Truffles: Your Sweet Treat!
- Total Time: 1 hour (including chilling)
- Yield: 24 truffles
- Diet: Vegetarian
Description
A delightful and easy-to-make sweet treat combining the classic flavors of Oreo cookies and creamy peanut butter, perfect for any occasion.
Ingredients
- 24 Oreo cookies
- 1/2 cup peanut butter
- 8 ounces cream cheese, softened
- 1 cup semi-sweet chocolate chips
- 1 tablespoon coconut oil (optional)
Instructions
- Crush Oreo cookies into fine crumbs.
- In a bowl, mix Oreo crumbs, peanut butter, and softened cream cheese until well combined.
- Roll the mixture into small balls (about 1 inch in diameter).
- Place the balls on a baking sheet lined with parchment paper and chill in the refrigerator for at least 30 minutes.
- Melt chocolate chips with coconut oil (if using) in a microwave-safe bowl in 30-second intervals, stirring in between, until smooth.
- Dip each truffle into the melted chocolate, coating completely.
- Place the coated truffles back on the parchment-lined baking sheet.
- Chill again until the chocolate has set.
Notes
- For a richer flavor, use creamy peanut butter.
- You can use milk chocolate or dark chocolate instead of semi-sweet.
- Garnish with chopped peanuts or extra Oreo crumbs before the chocolate sets for added texture.
- Prep Time: 20 minutes
- Cook Time: 5 minutes (for melting chocolate)
- Category: Dessert
- Method: No-bake
- Cuisine: American