Introduction to Olive Tapenade Recipe
Oh, hello there, fellow busy cooks! I know exactly how it feels when five o’clock hits, and you need a quick appetizer, Maybe you have unexpected guests, or perhaps you just want something beautiful for dinner.
That is where this amazing Olive Tapenade Recipe swoops in like a superhero cape! I first discovered tapenade on a whirlwind trip to Provence years ago, I swear, that first taste of the salty, briny olive spread changed my life, It was complex, deep, and utterly addictive.
Now, I make this Mediterranean dip all the time, It takes literally ten minutes to prepare, Seriously, ten minutes! This simple, elegant spread is the perfect solution for a hectic afternoon, Trust me, mastering this easy tapenade recipe will absolutely impress everyone, It’s my secret weapon for effortless entertaining, and now it can be yours too.
PrintOlive Tapenade Recipe: Make Delicious Tapenade Tonight!
- Total Time: 10 minutes
- Yield: About 1 cup
- Diet: Vegan
Description
A simple and delicious recipe for Olive Tapenade, perfect as a spread or dip.
Ingredients
- 1 cup mixed olives (such as Kalamata and green), pitted
- 2 tablespoons capers, drained
- 2 cloves garlic, peeled
- 1/4 cup fresh parsley leaves
- 2 tablespoons extra virgin olive oil
- 1 tablespoon fresh lemon juice
- 1/2 teaspoon black pepper
Instructions
- Combine the olives, capers, garlic, and parsley in the bowl of a food processor. Pulse until coarsely chopped.
- Add the olive oil, lemon juice, and black pepper. Pulse until well combined and the mixture reaches your desired consistency (chunky or smoother).
- Taste and adjust seasoning if needed.
- Serve immediately or transfer to an airtight container and refrigerate until ready to use.
Notes
- For a spicier tapenade, add a pinch of red pepper flakes.
- Store leftover tapenade in the refrigerator for up to 5 days.
- Tapenade is excellent served with crusty bread, crackers, or as a spread on sandwiches.
- Prep Time: 10 minutes
- Cook Time: 0 minutes
- Category: Appetizer/Dip
- Method: Food Processor
- Cuisine: Mediterranean
Why You’ll Love This Olive Tapenade Recipe
I get it; time is precious, especially after a long workday.
That is why I adore this straightforward **Olive Tapenade Recipe**.
Firstly, it is ridiculously fast; we are talking ten minutes flat.
No agonizing over complicated steps here!
Secondly, the flavor is simply magnificent.
It is salty, savory, and bright with lemon.
It instantly transports you to the sunny Mediterranean coast.
Plus, it uses simple pantry staples you probably already have.
This recipe is truly the definition of maximum flavor with minimum effort.
It is perfect for those “I need a gourmet snack now” moments!
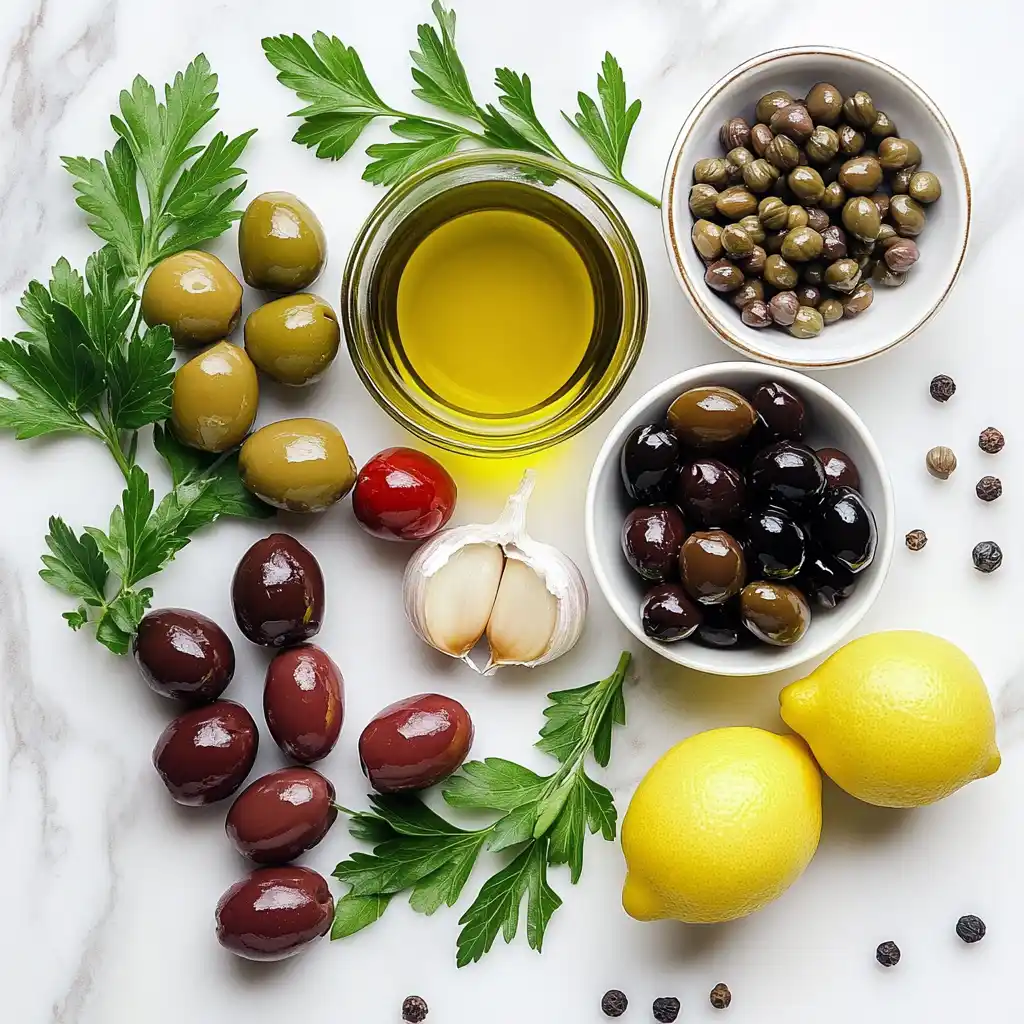
Essential Ingredients for the Perfect Olive Tapenade Recipe
Whenever I make this spread, I think of it as painting with flavor.
You only need a few high-quality ingredients to create magic.
The exact measurements are listed below in the printable recipe card.
However, let’s talk about the stars of the show first.
Sourcing good ingredients makes all the difference, truly.
The Star: Choosing Your Olives
The olives are the heart of any good Olive Tapenade Recipe.
I usually use a mix of Kalamata and green olives.
Kalamata olives give that wonderful, fruity depth and beautiful color.
Green olives add a sharper, slightly more acidic punch.
Make sure they are pitted, or you will spend forever prepping them!
Using jarred, brine-cured olives works perfectly fine here.
The Briny Boost: Capers and Anchovy Paste (Optional)
Capers are non-negotiable for me in this olive spread.
They bring a phenomenal, concentrated saltiness and texture.
Be sure to drain them well before tossing them in.
Now, about anchovy paste: I know some people balk at it.
You absolutely cannot taste “fish” in the finished tapenade.
Instead, the anchovy paste adds an incredible depth of umami flavor.
It acts like a secret seasoning, making the whole dip taste richer.
If you are strictly vegetarian, definitely skip it, but I always sneak a little in!
Aromatic Foundations: Garlic and Herbs
Garlic is essential for that Mediterranean warmth.
A couple of cloves is usually all you need.
Remember, raw garlic can be quite sharp, so start small.
Fresh parsley is my herb of choice for this tapenade.
It adds a bright, clean note that cuts through the richness of the olives.
Basil or oregano are nice, but parsley truly shines here.
Liquid Gold: Quality Olive Oil and Lemon Juice
Since this recipe is so simple, use the best extra virgin olive oil you can afford.
It binds the ingredients and adds a silky mouthfeel.
The oil should taste peppery and fresh, not flat.
Finally, fresh lemon juice is the finishing touch.
It provides necessary acidity and brightness.
That little squeeze of lemon wakes up all the flavors beautifully.
I always use fresh lemons, never the bottled stuff—it makes a difference!
A little black pepper finishes the seasoning perfectly.
How to Make Olive Tapenade Recipe
Making this beautiful Mediterranean dip is almost too easy.
Seriously, the hardest part is waiting to eat it!
We are going to use the food processor for speed and ease.
In just a few pulses, you will have a gorgeous, homemade olive spread.
Follow these steps for the perfect batch of **Olive Tapenade Recipe**.
Prepping Your Ingredients for Olive Tapenade Recipe
First things first, gather all your beautiful ingredients.
I like to measure everything out beforehand.
This method is called “mise en place,” and it saves so much time!
Make sure your olives are well-drained.
Also, drain the capers thoroughly too.
Peel the garlic cloves, but you do not need to chop them.
The food processor does all the hard work for us.
Pitting Olives the Quick Way
If you bought olives with pits, do not despair.
Pitting them is simpler than you think.
Place the olive flat on a cutting board.
Smash it gently with the side of a large knife.
The pit should pop right out easily.
I find this is way faster than using a specialty pitter.
The Food Processor Method for Olive Tapenade Recipe
Now, let us get blending!
Toss the olives, drained capers, garlic, and fresh parsley into the food processor bowl.
A little tip: make sure the lid is secured tightly first.
Pulse the mixture several times to get things started.
We are aiming for a coarse chop at this stage.
Do not just turn it on and walk away, though!
I usually use about five short bursts.
This initial pulsing ensures everything is roughly the same size.
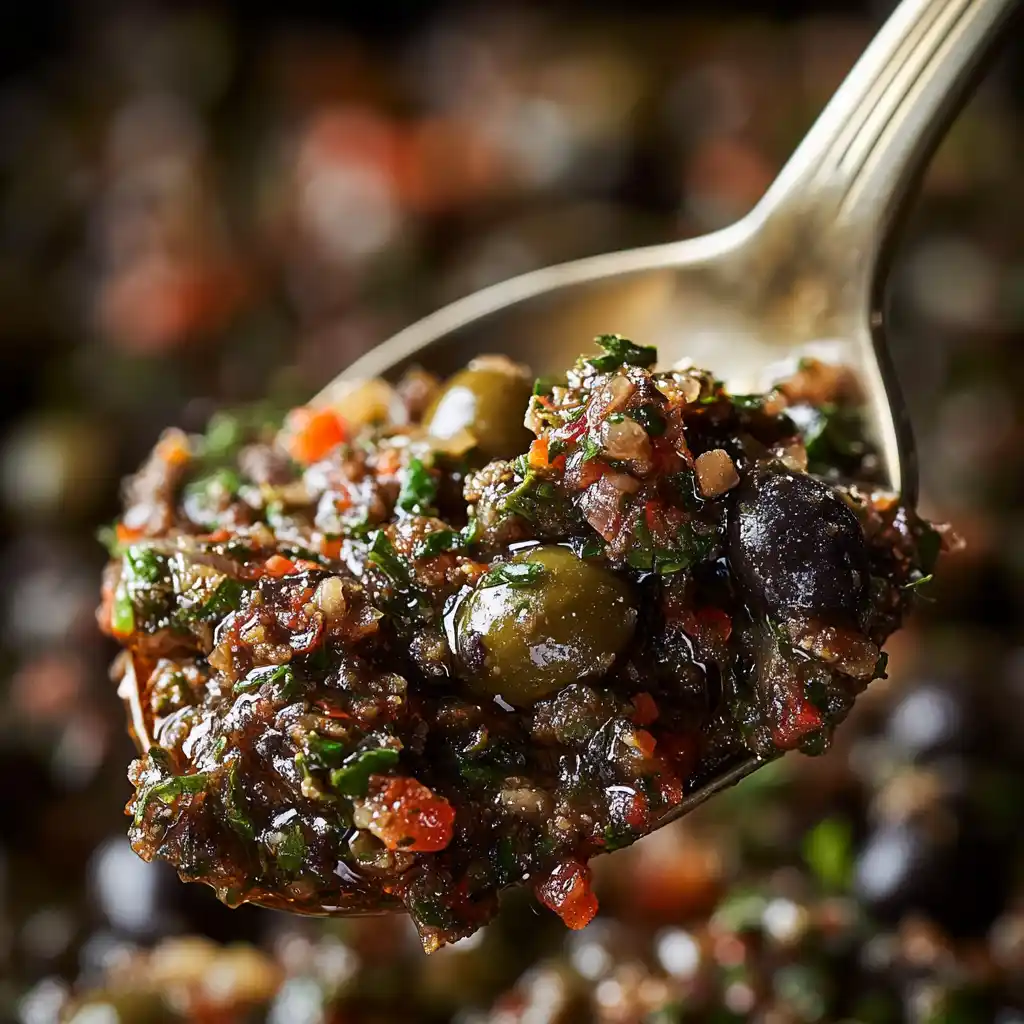
Achieving the Perfect Consistency
Next, it is time to add the “liquid gold.”
Pour in the extra virgin olive oil and the fresh lemon juice.
Add the black pepper now too.
Pulse the mixture again until it reaches your desired texture.
I prefer my homemade tapenade a little chunky.
I like seeing distinct pieces of olive and caper.
This gives the spread a wonderful rustic texture.
If you prefer a smoother olive paste, keep pulsing until it is uniform.
Just be careful not to over-process it.
If you blend it too long, it can turn into an oily emulsion.
We want a thick, spreadable dip, not a sauce.
The Critical Step: Tasting and Adjusting Seasoning
This step is absolutely crucial, friends.
Stop the machine and grab a small spoon.
Taste the **Olive Tapenade Recipe** carefully.
Does it need more brightness?
Add another tiny squeeze of lemon juice.
Is the flavor a bit flat?
A tiny pinch of salt might be needed, but taste first!
Remember, olives and capers are already quite salty.
Sometimes, I add a dash of red pepper flakes for subtle heat.
Adjusting the seasoning makes this simple dip truly shine.
Once perfected, transfer your beautiful tapenade to a small serving bowl.
It is ready to impress your family and friends!
Quick Tips for Success
I have learned a few tricks over the years for this amazing Olive Tapenade Recipe.
These little secrets ensure your olive spread turns out perfectly every time.
- Always use cold olives straight from the jar; they pulse better.
- Do not over-process the mixture; aim for a rustic, chunky texture.
- Let the tapenade sit for 30 minutes before serving.
- This resting time allows the flavors to truly marry.
- Taste before adding salt, as olives and capers provide plenty.
- A tiny splash of vinegar can replace lemon juice in a pinch.
Equipment Needed to Make This Delicious Spread
The beauty of this recipe is its simplicity.
You really do not need much fancy equipment at all.
Here are the essential kitchen tools.
- A standard food processor is the fastest method.
- Alternatively, use a sharp chef’s knife and cutting board for a hand-chopped version.
- A small rubber spatula helps scrape down the sides.
- You will need measuring spoons and cups for accuracy.
Variations on the Classic Olive Tapenade Recipe
While the classic recipe is divine, feel free to experiment!
Tweak this Mediterranean dip to suit your own unique taste.
- Add sun-dried tomatoes for a sweeter, richer flavor profile.
- Toss in some toasted walnuts or pine nuts for extra crunch.
- A teaspoon of Dijon mustard adds a nice tanginess.
- Try adding fresh oregano or thyme for a more earthy note.
Making a Green Olive Tapenade Recipe
Sometimes I crave something lighter and brighter.
That is when I switch entirely to a green olive spread.
- Use only Castelvetrano or large Spanish green olives.
- Increase the amount of fresh parsley and lemon zest.
- Skip the anchovies entirely for a cleaner flavor.
- Blend in a pinch of fresh mint for ultimate freshness.
Dietary Swaps for This Olive Tapenade Recipe
This recipe is naturally vegan and gluten-free, which is great!
It is super easy to adapt for other diets or preferences.
- For low-sodium diets, rinse the capers thoroughly before use.
- Use oil-cured olives instead of brine-cured for deeper flavor.
- Swap out the olive oil for avocado oil if you prefer.
- Make sure your lemon juice is freshly squeezed every time.
Serving Suggestions for Your Homemade Tapenade
This versatile olive spread shines in so many ways.
It is not just for dipping, I assure you!
- Serve it simply with toasted baguette slices or rustic crackers.
- Spread it on grilled chicken or fish fillets before baking.
- Use it as a flavorful base on homemade pizzas or flatbreads.
- Dollop it onto scrambled eggs or omelets for breakfast.
- Mix it into pasta salad for an instant flavor boost.
FAQs about Olive Tapenade Recipe
I get lots of questions about storing and using this delicious Olive Tapenade Recipe.
Here are the answers to the most common inquiries I receive.
How long does homemade tapenade last?
If you store your homemade tapenade properly, it lasts quite well.
Keep it in an airtight container in the refrigerator.
It will stay fresh and delicious for about five days.
Just make sure to cover the top with a thin layer of olive oil before sealing.
This trick keeps the bright green color from oxidizing.
Can I make this Olive Tapenade Recipe without a food processor?
Yes, absolutely you can!
You can definitely make this Mediterranean dip by hand.
Just chop all the ingredients very finely using a sharp knife.
It takes a bit longer, but the texture is wonderfully rustic.
A mortar and pestle also works beautifully for a very traditional method.
What is the difference between tapenade and olive paste?
That is a great question often asked about this olive spread!
Olive paste is essentially just pureed olives and olive oil.
Tapenade is much more complex and flavorful.
It traditionally includes capers, garlic, and herbs.
So, tapenade has a deeper, more savory flavor profile overall.
Is this Mediterranean dip freezer-friendly?
I generally advise against freezing this Olive Tapenade Recipe.
Freezing can drastically change the texture of the tapenade.
It tends to become mushy and the olive oil can separate easily.
Since it is so fast to prepare, I suggest making it fresh instead.
Just make a small batch weekly for the best results.
Final Thoughts on the Joy of Homemade Spreads
There is just something incredibly satisfying about making your own gourmet spreads.
This simple Olive Tapenade Recipe is proof that easy can be elegant.
I love watching faces light up when they taste this vibrant dip.
It is savory, salty, and bright—a true taste explosion!
Whip up a batch tonight; you deserve this little bit of Mediterranean sunshine.
It is the perfect way to elevate a simple snack time instantly.
Happy cooking, my friends!
Equipment Needed to Make This Delicious Spread
The beauty of this recipe is its simplicity.
You really do not need much fancy equipment at all.
Here are the essential kitchen tools.
- A standard food processor is the fastest method.
- Alternatively, use a sharp chef’s knife and cutting board for a hand-chopped version.
- A small rubber spatula helps scrape down the sides.
- You will need measuring spoons and cups for accuracy.
Variations on the Classic Olive Tapenade Recipe
While the classic recipe is divine, feel free to experiment!
Tweak this Mediterranean dip to suit your own unique taste.
- Add sun-dried tomatoes for a sweeter, richer flavor profile.
- Toss in some toasted walnuts or pine nuts for extra crunch.
- A teaspoon of Dijon mustard adds a nice tanginess.
- Try adding fresh oregano or thyme for a more earthy note.
Making a Green Olive Tapenade Recipe
Sometimes I crave something lighter and brighter.
That is when I switch entirely to a green olive spread.
- Use only Castelvetrano or large Spanish green olives.
- Increase the amount of fresh parsley and lemon zest.
- Skip the anchovies entirely for a cleaner flavor.
- Blend in a pinch of fresh mint for ultimate freshness.
Dietary Swaps for This Olive Tapenade Recipe
This recipe is naturally vegan and gluten-free, which is great!
It is super easy to adapt for other diets or preferences.
- For low-sodium diets, rinse the capers thoroughly before use.
- Use oil-cured olives instead of brine-cured for deeper flavor.
- Swap out the olive oil for avocado oil if you prefer.
- Make sure your lemon juice is freshly squeezed every time.
Serving Suggestions for Your Homemade Tapenade
This versatile olive spread shines in so many ways.
It is not just for dipping, I assure you!
- Serve it simply with toasted baguette slices or rustic crackers.
- Spread it on grilled chicken or fish fillets before baking.
- Use it as a flavorful base on homemade pizzas or flatbreads.
- Dollop it onto scrambled eggs or omelets for breakfast.
- Mix it into pasta salad for an instant flavor boost.
FAQs about Olive Tapenade Recipe
I get lots of questions about storing and using this delicious Olive Tapenade Recipe.
Here are the answers to the most common inquiries I receive.
How long does homemade tapenade last?
If you store your homemade tapenade properly, it lasts quite well.
Keep it in an airtight container in the refrigerator.
It will stay fresh and delicious for about five days.
Just make sure to cover the top with a thin layer of olive oil before sealing.
This trick keeps the bright green color from oxidizing.
Can I make this Olive Tapenade Recipe without a food processor?
Yes, absolutely you can!
You can definitely make this Mediterranean dip by hand.
Just chop all the ingredients very finely using a sharp knife.
It takes a bit longer, but the texture is wonderfully rustic.
A mortar and pestle also works beautifully for a very traditional method.
What is the difference between tapenade and olive paste?
That is a great question often asked about this olive spread!
Olive paste is essentially just pureed olives and olive oil.
Tapenade is much more complex and flavorful.
It traditionally includes capers, garlic, and herbs.
So, tapenade has a deeper, more savory flavor profile overall.
Is this Mediterranean dip freezer-friendly?
I generally advise against freezing this Olive Tapenade Recipe.
Freezing can drastically change the texture of the tapenade.
It tends to become mushy and the olive oil can separate easily.
Since it is so fast to prepare, I suggest making it fresh instead.
Just make a small batch weekly for the best results.
Final Thoughts on the Joy of Homemade Spreads
There is just something incredibly satisfying about making your own gourmet spreads.
This simple **Olive Tapenade Recipe** is proof that easy can be elegant.
I love watching faces light up when they taste this vibrant Mediterranean dip.
It is savory, salty, and bright—a true taste explosion!
Whip up a batch tonight; you deserve this little bit of Mediterranean sunshine.
It is the perfect way to elevate a simple snack time instantly.
Happy cooking, my friends!