Introduction to Cider-Glazed Brussels Sprouts
Oh, honey, if you’re anything like me, you live in that beautiful, frantic space between carpool pickup and the 6:00 PM dinner bell. We are constantly juggling, aren’t we?
I know the struggle of trying to get a vegetable on the table that doesn’t feel like a chore.
That is why I am so thrilled to share this recipe for **Cider-Glazed Brussels Sprouts**.
This isn’t just another side dish; it’s a revelation.
Honestly, it’s the perfect quick solution for a busy day when you need something impressive.
These sprouts are tender-crisp and coated in a sticky, sweet-and-savory apple cider glaze.
They are ready in about 15 minutes, which is faster than ordering takeout!
Trust me, even the pickiest eaters will ask for seconds of these amazing **Cider-Glazed Brussels Sprouts**.
Why You’ll Love This Cider-Glazed Brussels Sprouts
I get it, time is precious, like gold dust in our busy lives.
We need recipes that deliver big flavor without the drama.
This recipe checks all those boxes and then some.
It truly transforms the humble Brussels sprout into a star.
Forget boiling or roasting for hours; this is fast, fun, and delicious.
A Quick Solution for Busy Weeknights
Seriously, 15 minutes is all you need for this vegetable side.
I developed this recipe specifically for those chaotic weeknights.
It moves quicker than my kids when the ice cream truck drives by!
You can go from chopping to plating in a flash.
This is truly my secret weapon against mealtime fatigue.
The Perfect Balance of Sweet and Savory
The beauty of these **Cider-Glazed Brussels Sprouts** lies in the contrast.
We caramelize the sprouts until they are slightly charred and nutty.
Then, the apple cider reduces down into a sticky, sweet syrup.
It’s a symphony of savory vegetable and bright, autumnal sweetness.
This balance makes them utterly addictive, I promise.
Ingredients for Cider-Glazed Brussels Sprouts
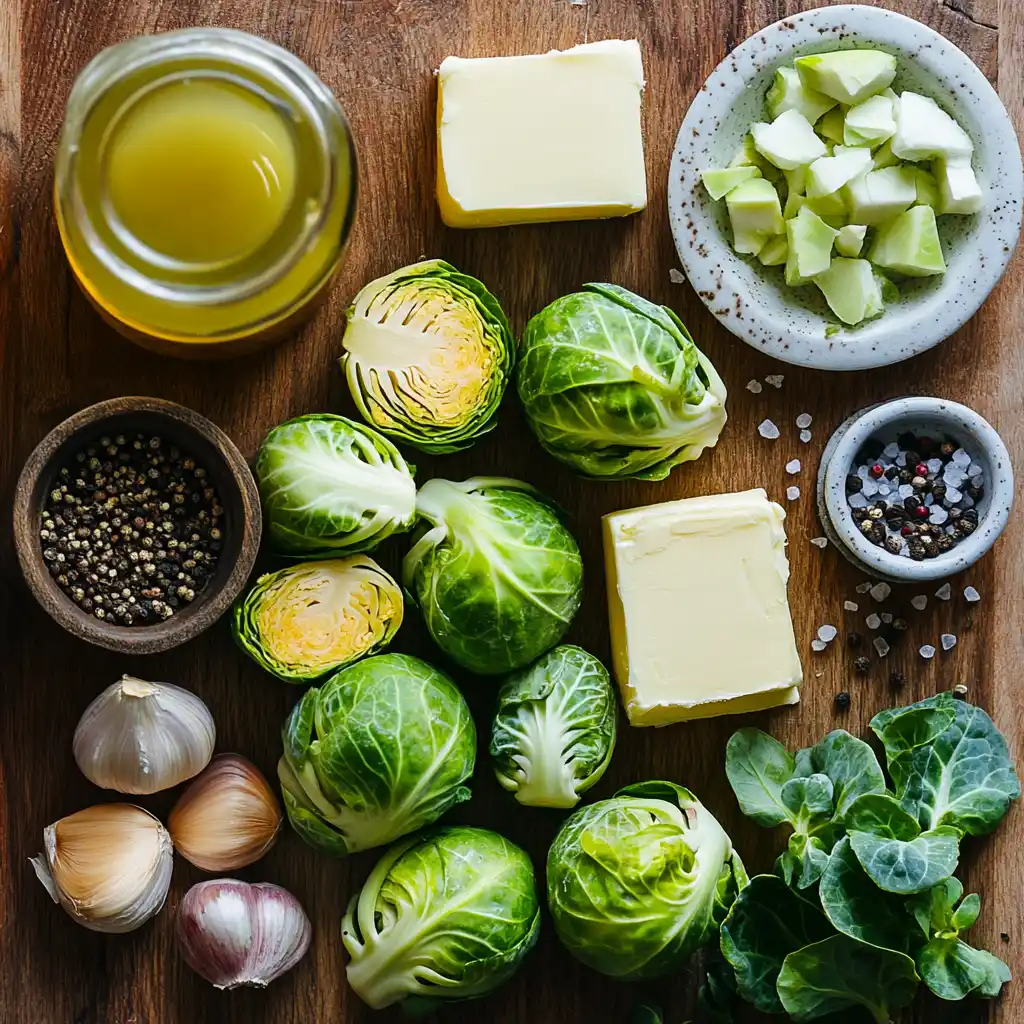
You know, the secret to any truly great dish isn’t complicated techniques.
It’s using just a few high-quality ingredients that sing together.
This recipe for **Cider-Glazed Brussels Sprouts** requires only five main items.
I love how easily these simple components create such a rich flavor profile.
Find the exact measurements for these ingredients at the bottom of this post.
Don’t worry, the list is wonderfully short and sweet!
Choosing the Best Brussels Sprouts
We start with one pound of fresh Brussels sprouts.
Look for bright green sprouts that feel firm and compact.
Avoid any that look yellowed or have black spots, okay?
I always trim the woody ends first, then cut them in half.
Halving them ensures they cook evenly and soak up that amazing glaze.
Fresh is always best for that tender-crisp texture we are chasing.
The Magic of Apple Cider
This is where the magic truly happens, my friends.
You will need about half a cup of good quality apple cider.
Make sure it is actual apple cider, not apple juice.
Cider has a deeper, more complex flavor that reduces beautifully.
It is the star of our cider glaze, offering that autumnal sweetness.
If you cannot find cider, apple juice will work in a pinch, but the flavor won’t be as robust.
Essential Seasonings and Fats
To start, we need butter for sautéing and building flavor.
I use just a couple of tablespoons of unsalted butter here.
The butter provides richness and helps caramelize the sprouts beautifully.
If you need a dairy-free swap, olive oil or a vegan butter substitute works well.
We finish the dish with simple kosher salt and black pepper.
These essential seasonings enhance the natural sweetness of the **Cider-Glazed Brussels Sprouts**.
Sometimes, the simplest ingredients make the biggest impact!
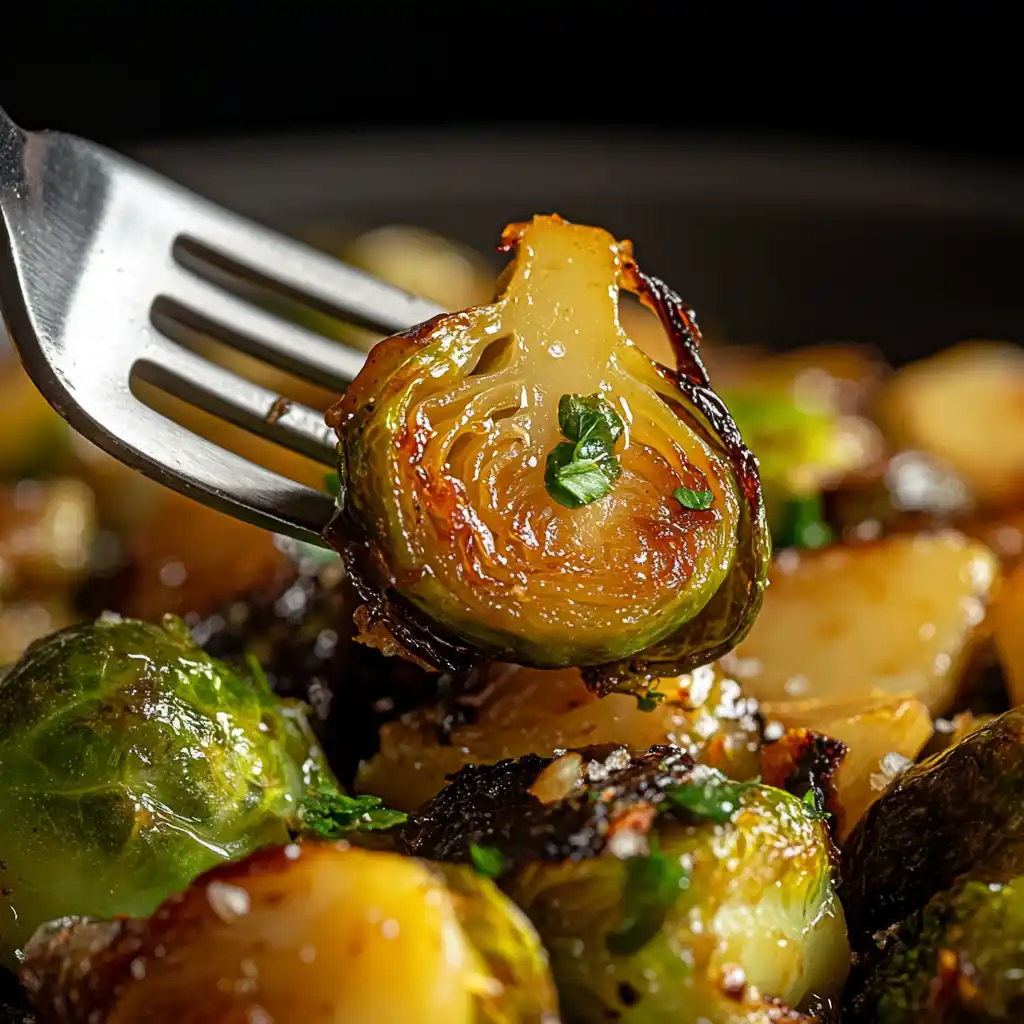
How to Make Cider-Glazed Brussels Sprouts
Okay, let’s get cooking! This is the fastest part of the entire process.
You’ll be amazed at how quickly this humble vegetable transforms.
I promise, these steps are straightforward and super easy to follow.
We are aiming for that perfect, sticky texture and tender-crisp bite.
Just remember to keep the heat consistent for the best **Cider-Glazed Brussels Sprouts**.
Prepping Your Brussels Sprouts for Optimal Glazing
First things first, preparation is key to speed.
Take those fresh sprouts and give them a good rinse.
Trim off any dry or woody ends, please.
Next, slice each sprout neatly in half, from top to bottom.
This increases the surface area for beautiful browning and glazing.
We want every piece to grab onto that delicious apple cider glaze.
Sautéing the Sprouts to Develop Flavor
Now, grab your largest skillet; a wide surface area is important.
Melt the butter over a robust medium-high heat.
Once the butter is bubbly, add your halved Brussels sprouts.
Cook them, stirring only occasionally, for about five minutes.
This initial sautéing step is crucial for developing nutty, deep flavor.
Look for those gorgeous, browned spots—that’s called caramelization!
These browned bits add so much complexity to the final dish.
Creating the Cider-Glazed Brussels Sprouts
Next, we introduce the liquid component of our apple cider glaze.
Pour in the apple cider right over the hot sprouts.
Then, sprinkle in the kosher salt and black pepper.
It will bubble up dramatically, which is exactly what we want!
Bring that liquid mixture to a full, rolling boil immediately.
This boiling action starts the reduction process right away.
This is where the magic of the **Cider-Glazed Brussels Sprouts** truly begins.
Reducing the Glaze to Perfection
Once boiling, reduce the heat down to medium-low.
Let the mixture simmer, uncovered, for about five to seven minutes.
The goal is to let the cider evaporate and thicken into a glaze.
Keep an eye on it; you want a sticky, syrupy coating, not soup.
The sprouts should be tender-crisp, holding their shape nicely.
If they get too soft, they lose that satisfying crunch, alas.
When the glaze coats the back of a spoon, your quick side dish is ready!
Serve these amazing **Cider-Glazed Brussels Sprouts** right away for the best flavor.
Tips for Success
I’ve made these **Cider-Glazed Brussels Sprouts** countless times, and I have learned a few tricks.
These simple tips will ensure your side dish is always restaurant-quality.
A little finesse goes a long way in achieving perfection, trust me.
Achieving the Perfect Texture
Achieving the Perfect Texture
- Do not overcrowd the skillet during the sautéing step.
- Overcrowding steams the sprouts instead of browning them.
- Work in batches if your skillet is too small for one pound.
- If you prefer softer sprouts, simply cover the skillet during simmering.
- Keep the heat consistent throughout the reduction process.
Flavor Boosters for Cider-Glazed Brussels Sprouts
Flavor Boosters for Cider-Glazed Brussels Sprouts
- Add a splash of balsamic vinegar at the end for tang.
- A tiny drizzle of maple syrup enhances the sweetness.
- Toss in a pinch of red pepper flakes for subtle heat.
- Finish with freshly grated Parmesan cheese right before serving.
- A sprinkle of smoked paprika adds a wonderful, deep savory note.
Equipment Needed
You truly don’t need fancy gadgets for this quick side dish.
Simple kitchen tools are all you require for this recipe.
Less cleanup means more time to relax, right?
- A sharp knife and cutting board for trimming the sprouts.
- A large, heavy-bottomed skillet is essential for even heat.
- A wooden spoon or spatula for stirring the sprouts.
- Use a skillet with a wide surface area for the best caramelization.
Variations for Cider-Glazed Brussels Sprouts
This recipe is a wonderful foundation, but feel free to play!
I always encourage swapping ingredients to suit your family’s tastes.
Cooking is about creativity and using what you have available.
Dietary Swaps for Cider-Glazed Brussels Sprouts
- Swap butter for olive oil or vegan butter to keep it dairy-free.
- For a keto-friendly version, use chicken broth instead of cider.
- Add a few drops of liquid stevia if you need sugar-free sweetness.
- You can use vegetable broth if you are out of apple cider.
Adding Meat and Crunch
- Crispy bacon or pancetta bits are a classic pairing with Brussels sprouts.
- Cook the bacon first and use the rendered fat instead of butter.
- Stir in toasted pecans or walnuts for a delightful crunch.
- A handful of dried cranberries adds chewy texture and tartness.
Serving Suggestions
These flavorful sprouts pair beautifully with nearly any main course.
They are especially perfect alongside rich, savory proteins.
Think cozy comfort food, elevated by this amazing side.
- Serve them alongside roasted chicken or pork tenderloin.
- They are fantastic with creamy mashed potatoes and gravy.
- Pair with a crisp glass of hard cider or a dry white wine.
- Garnish with fresh thyme or parsley for a pop of color.
FAQs about Cider-Glazed Brussels Sprouts
I get lots of questions about quick vegetable sides.
Here are the answers to the most common inquiries about this recipe.
I want you to feel totally confident when making these **Cider-Glazed Brussels Sprouts**.
Can I Use Frozen Brussels Sprouts?
You absolutely can use frozen sprouts, but the texture will change.
Frozen vegetables tend to be softer than fresh ones.
Thaw them first, then pat them completely dry before sautéing.
Excess water will prevent the sprouts from browning properly.
What is the Best Type of Apple Cider to Use?
Use traditional, unfiltered apple cider for the best flavor.
Unfiltered cider has a richer, cloudier appearance and deeper taste.
Avoid sparkling cider or hard cider for this specific glaze.
The natural sugars in the cider are what create that sticky glaze.
How Do I Store Leftover Cider-Glazed Brussels Sprouts?
Store any leftovers in an airtight container in the refrigerator.
They will keep nicely for up to three or four days.
Reheat them quickly in a hot skillet to regain some crispness.
You can also enjoy them cold, chopped into a lunch salad.
Can I Make This Recipe in the Oven Instead?
Yes, you can adapt this recipe for the oven, but it takes longer.
Roast the sprouts at 400°F until tender and brown, about 20 minutes.
Meanwhile, reduce the cider in a saucepan until syrupy.
Toss the roasted sprouts with the **apple cider glaze** right before serving.
Final Thoughts
See? Making a delicious, healthy side doesn’t have to be a marathon.
These **Cider-Glazed Brussels Sprouts** are proof that fast food can be fantastic food.
I hope this recipe brings a little bit of joy and ease to your busy weeknights.
There’s nothing better than watching my family devour a vegetable dish like this one.
It feels like a small culinary victory every single time.
Go ahead, grab your skillet, and make some magic happen tonight!
Happy cooking, my friends!
Equipment Needed
You truly don’t need fancy gadgets for this quick side dish.
Simple kitchen tools are all you require for this recipe.
Less cleanup means more time to relax, right?
- A sharp knife and cutting board are needed for trimming the sprouts.
- A large, heavy-bottomed skillet is essential for even heat distribution.
- Use a wide skillet for the best caramelization results.
- A wooden spoon or spatula works perfectly for stirring the sprouts.
Variations for Cider-Glazed Brussels Sprouts
This recipe is a wonderful foundation, but feel free to play!
I always encourage swapping ingredients to suit your family’s tastes.
Cooking is about creativity and using what you have available.
Dietary Swaps for Cider-Glazed Brussels Sprouts
- Swap butter for olive oil or vegan butter to keep it dairy-free.
- For a keto-friendly version, use chicken broth instead of cider.
- Add a few drops of liquid stevia if you need sugar-free sweetness.
- You can use vegetable broth if you are out of apple cider.
Adding Meat and Crunch
- Crispy bacon or pancetta bits are a classic pairing with Brussels sprouts.
- Cook the bacon first and use the rendered fat instead of butter.
- Stir in toasted pecans or walnuts for a delightful crunch.
- A handful of dried cranberries adds chewy texture and tartness.
- Try adding some shaved Parmesan cheese right at the end.
Serving Suggestions
These flavorful sprouts pair beautifully with nearly any main course.
They are especially perfect alongside rich, savory proteins.
Think cozy comfort food, elevated by this amazing side.
- Serve them alongside roasted chicken or a juicy pork tenderloin.
- They are fantastic with creamy mashed potatoes and pan gravy.
- Pair this **Cider-Glazed Brussels Sprouts** with a crisp hard cider.
- Garnish with fresh thyme or parsley for a bright pop of color.
- These also complement a thick slice of holiday ham perfectly.
FAQs about Cider-Glazed Brussels Sprouts
I get lots of questions about quick vegetable sides.
Here are the answers to the most common inquiries about this recipe.
I want you to feel totally confident when making these **Cider-Glazed Brussels Sprouts**.
Can I Use Frozen Brussels Sprouts?
You absolutely can use frozen sprouts, but the texture will change.
Frozen vegetables tend to be softer than fresh ones, unfortunately.
Thaw them first, then pat them completely dry before sautéing.
Excess water will prevent the sprouts from browning properly.
If you use frozen, you might need to simmer them a little less.
What is the Best Type of Apple Cider to Use?
Use traditional, unfiltered apple cider for the best flavor.
Unfiltered cider has a richer, cloudier appearance and deeper taste.
Avoid sparkling cider or hard cider for this specific glaze.
The natural sugars in the cider are what create that perfect sticky **apple cider glaze**.
Look for a quality local cider if you can find one.
How Do I Store Leftover Cider-Glazed Brussels Sprouts?
Store any leftovers in an airtight container in the refrigerator.
They will keep nicely for up to three or four days.
Reheat them quickly in a hot skillet to regain some crispness.
You can also enjoy them cold, chopped into a lunch salad for a great texture.
Can I Make This Recipe in the Oven Instead?
Yes, you can adapt this recipe for the oven, but it takes longer than 15 minutes.
Roast the sprouts at 400°F until tender and brown, about 20 minutes.
Meanwhile, reduce the cider, butter, salt, and pepper in a saucepan until syrupy.
Toss the roasted sprouts with the thick **apple cider glaze** right before serving.
This method works well if your stovetop is already full.
Final Thoughts
Honestly, cooking shouldn’t feel like a high-pressure performance.
It should be about creating joy and simple, delicious moments.
These **Cider-Glazed Brussels Sprouts** embody that philosophy perfectly.
They are proof that we can put a healthy, incredible side dish on the table.
We can do this even when the clock is ticking like crazy.
I find such satisfaction in watching my family truly enjoy their vegetables.
This recipe is a small, sweet victory in the daily dinner routine.
Go ahead, make this **apple cider glaze** magic happen tonight!
You deserve quick, satisfying recipes that make you feel like a star.
Happy cooking, and enjoy every flavorful bite!
PrintCider-Glazed Brussels Sprouts: Delicious in 15 Minutes!
- Total Time: 15-17 minutes
- Yield: 4 servings
- Diet: Vegetarian
Description
A quick and flavorful side dish of Brussels sprouts glazed with apple cider and butter, ready in just 15 minutes.
Ingredients
- 1 pound Brussels sprouts, trimmed and halved
- 2 tablespoons butter
- 1/2 cup apple cider
- 1/4 teaspoon kosher salt
- 1/8 teaspoon black pepper
Instructions
- In a large skillet, melt the butter over medium-high heat.
- Add the Brussels sprouts and cook, stirring occasionally, until browned in spots, about 5 minutes.
- Pour in the apple cider, salt, and pepper. Bring to a boil.
- Reduce the heat to medium-low and simmer, uncovered, until the cider has reduced to a thick glaze and the Brussels sprouts are tender-crisp, about 5 to 7 minutes.
- Serve immediately.
Notes
- If you prefer softer sprouts, cover the skillet during the simmering time.
- For a touch of sweetness, a drizzle of maple syrup or honey can be added along with the cider.
- Prep Time: 5 minutes
- Cook Time: 10-12 minutes
- Category: Side Dish
- Method: Stovetop/Sautéing