Halloween is such a fun time! I love seeing all the decorations. It’s also a busy time for us parents and professionals. Planning parties takes time. Finding quick, festive treats is key. That’s where these amazing Baked Cheese Mummies come in!
They are so easy to make. You’ll have a spooky snack ready fast. It’s a win-win for everyone involved. Get ready to wow your guests or just enjoy a fun family night.
Table of Contents
Why You’ll Love This Baked Cheese Mummies
These Baked Cheese Mummies are pure magic for busy weeknights. They come together in a flash. Kids adore them. Adults love them too!
You get that yummy, gooey cheese. The crescent dough bakes up golden. It’s a simple way to add festive fun. It truly makes Halloween special.
Ingredients for Baked Cheese Mummies
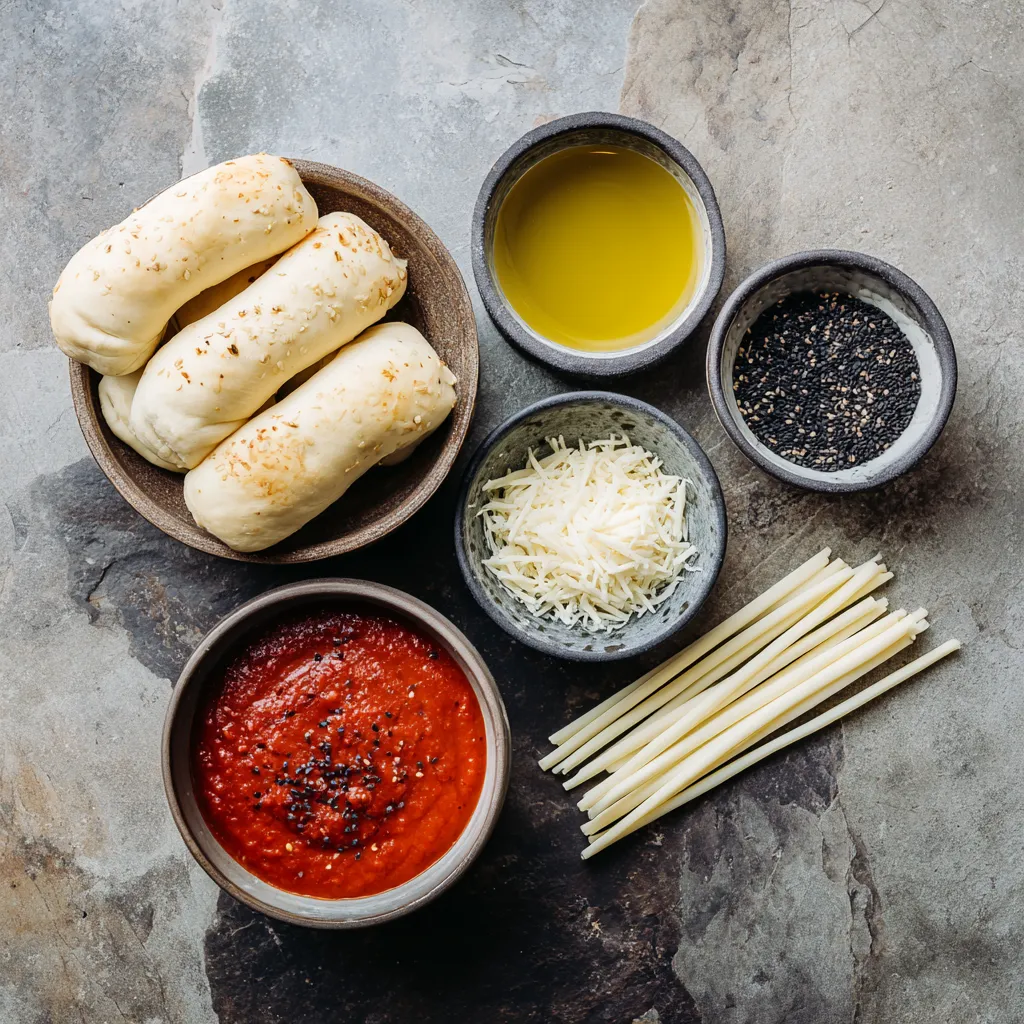
Let’s talk about what you’ll need for these adorable Baked Cheese Mummies. It’s a short list. You probably have most things already. I love recipes like that!
The exact amounts are listed at the bottom. You can print them out easily. This makes grocery shopping a breeze.
Crescent Roll Dough
This is our mummy’s wrapping. It bakes up so flaky and golden. It’s a kid-friendly favorite. You can find this in the refrigerated section. Look near the biscuits.
String Cheese Sticks
These are the gooey centers. They melt beautifully inside the dough. Any brand works well here. They are perfect for little hands to hold.
Olive Oil
A little brush of olive oil adds shine. It helps the dough turn golden brown. It also helps the sesame seeds stick. Use your favorite kind.
Black Sesame Seeds
These are for our mummy’s eyes. They add a cute, spooky touch. You can find them in most grocery stores. They are often in the spice aisle.
Marinara Sauce
This is for dipping. It’s the perfect complement. It adds a little zing. Your little mummies will love dipping.
How to Make Baked Cheese Mummies
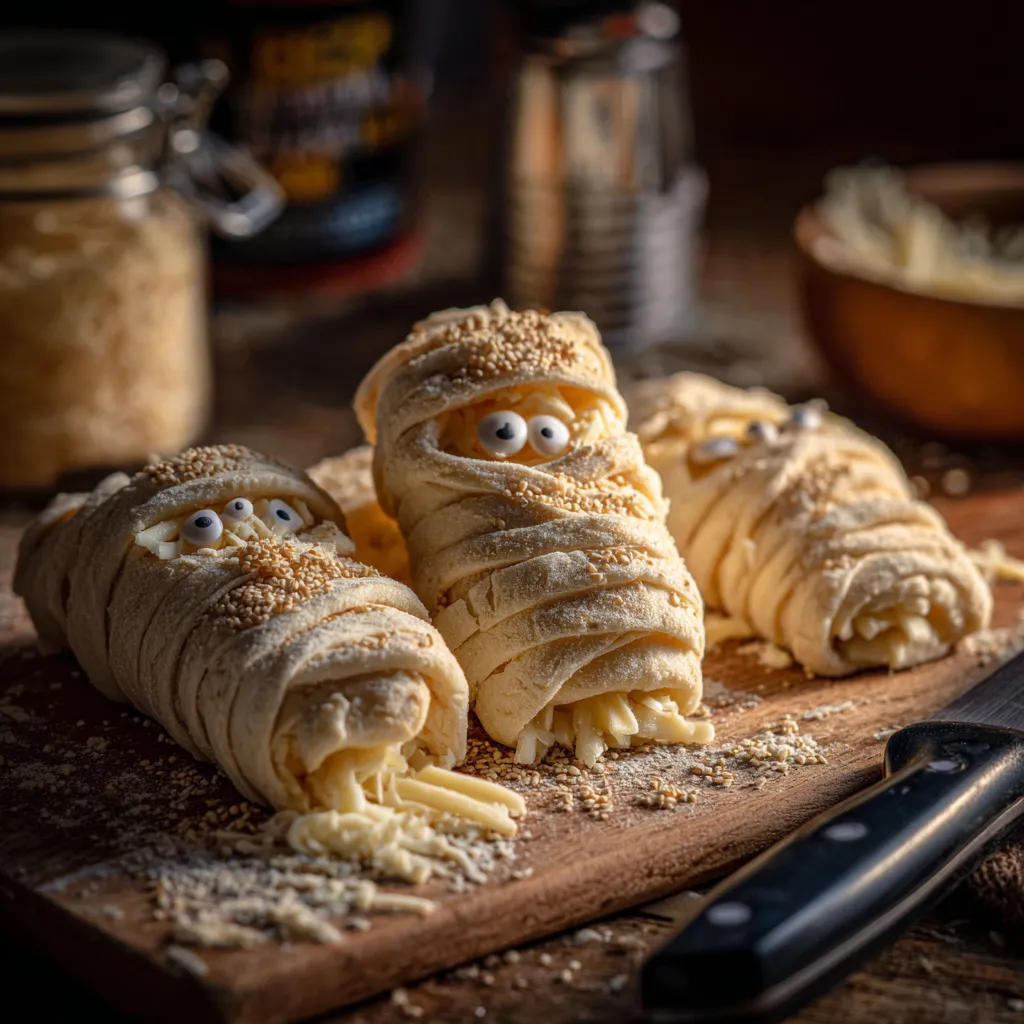
Let’s get down to business! Making these Baked Cheese Mummies is so much fun. It’s a simple process. You’ll be done before you know it. Follow these steps closely.
We’ll create some spooky, cheesy delights. It’s a great activity for kids too. Let’s turn simple ingredients into Halloween magic.
Prepare Your Workspace and Oven
First, get your oven ready. Preheat it to 375°F. That’s 190°C for those who prefer. Line a baking sheet. Parchment paper is your friend here. It stops sticking. This makes cleanup a breeze.
Get Your Cheese Ready
Now, grab your string cheese. You need eight sticks. Halve each one lengthwise. This gives you sixteen pieces. These will be the bodies of our mummies. It’s a simple step.
Wrap the Mummies
Unroll the crescent dough. Separate it into eight triangles. Cut each triangle in half. You want thin strips. Wrap these strips around the cheese pieces. Leave a small gap. This space is for the mummy’s face. Don’t wrap too tightly. The dough will expand. Arrange them on your baking sheet. These are our spooky cheese snacks!
Add the Mummy Eyes
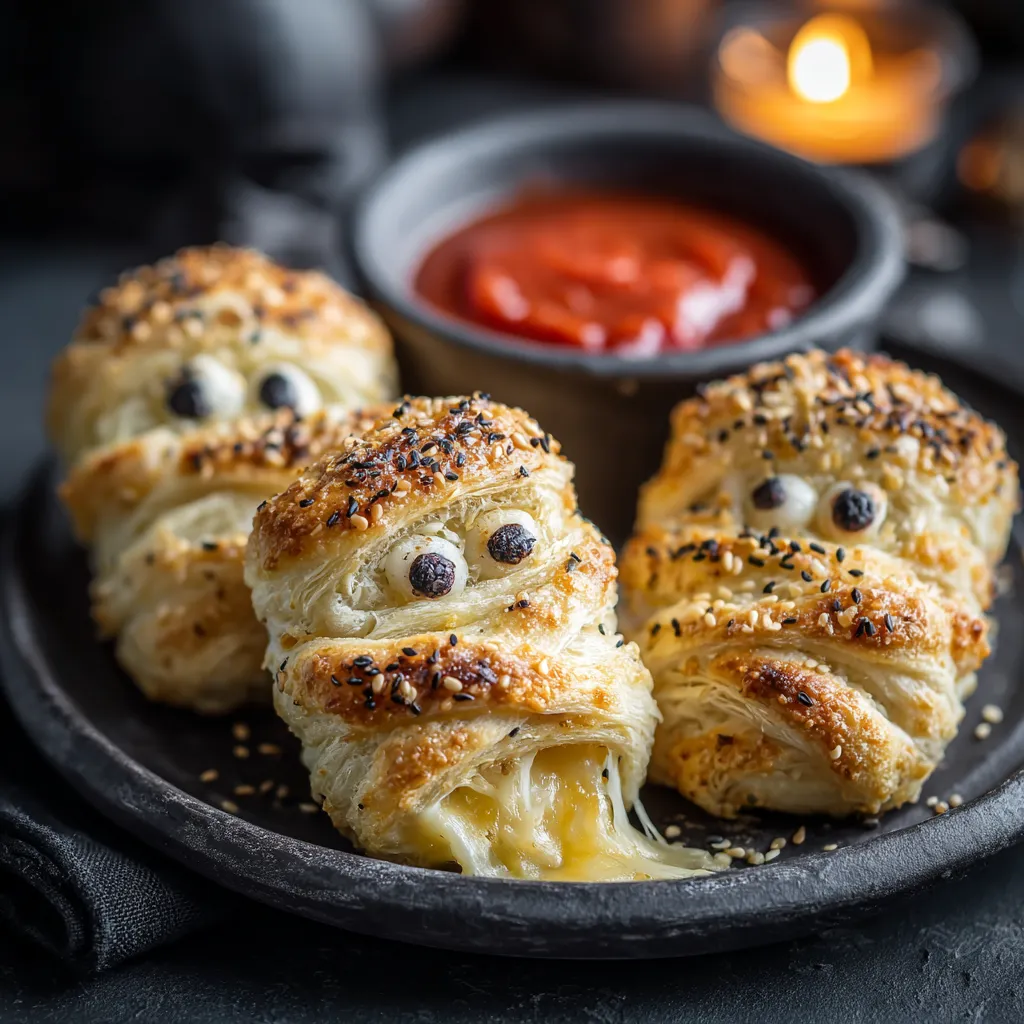
Time for the mummy’s eyes. Brush the wrapped cheese lightly. Use olive oil for this. Then, place two sesame seeds. They create the perfect spooky eyes. Push them gently into the dough. This little detail makes them pop. It’s a key part of our Halloween appetizer.
Bake to Golden Perfection
Now, bake them. This takes about 10-12 minutes. Watch them closely. You want them golden brown. The cheese inside will get melty. It’s a delightful aroma. Your kitchen will smell amazing. This is the best part of baking.
Serve Your Spooky Creations
Once they’re golden, take them out. Let them cool slightly. They are best served warm. Have your marinara sauce ready. These Baked Cheese Mummies are perfect for dipping. Enjoy your festive treat!
Tips for Success
- Use fresh crescent roll dough. It wraps easier.
- Don’t overwrap the cheese. Leave space for eyes.
- Watch baking time carefully. They brown quickly.
- For crispier mummies, bake a minute longer.
- Keep dough chilled until you need it.
Equipment Needed
- Baking sheet. A cookie sheet works too.
- Parchment paper. Foil is an alternative option.
- Pastry brush. A clean finger works in a pinch.
- Knife. A pizza cutter is also good.
Variations for Baked Cheese Mummies
Don’t be afraid to get creative with these Baked Cheese Mummies! I love tweaking recipes. It makes them uniquely mine. Here are some ideas to try.
These simple twists add extra flair. They cater to different tastes too. Let’s explore some fun options.
Different Cheese Options
- Try mozzarella string cheese. It’s mild and melty.
- Provolone string cheese offers a sharper taste.
- Pepper Jack string cheese gives a little kick.
Alternative Wrappings
- Use puff pastry sheets. Cut them into strips.
- Try refrigerated pizza dough. It’s a bit thicker.
- For a gluten-free option, use gluten-free dough.
Creative Eye Embellishments
- Use small pieces of black olives. They look great.
- Edible candy eyes are super cute.
- A tiny dot of mustard works too.
- Carve small gaps for the eyes.
Serving Suggestions
- Serve with a side of warm marinara.
- Offer ranch dip for another option.
- Pair with veggie sticks like carrots.
- A spooky punch or apple cider is great.
- Arrange them on a platter with cobwebs.
FAQs about Baked Cheese Mummies
Got questions about our spooky Baked Cheese Mummies? I’ve got answers! Let’s clear up any doubts.
These are common queries. I’m happy to help you out. It ensures perfect results every time.
Can I make Baked Cheese Mummies ahead of time?
You can assemble them. Store them covered in the fridge. Bake them just before serving. This keeps them nice and fresh. They are best enjoyed warm from the oven.
What can I use if I don’t have sesame seeds for the eyes?
No sesame seeds? No problem! Small dots of black olive paste work. You can also use tiny pieces of nori seaweed. Edible candy eyes are a fun alternative too. Get creative with your spooky snacks!
Are Baked Cheese Mummies a good option for a kids’ Halloween party?
Absolutely! These are a huge hit with kids. They are easy to hold. The cheese is melty and delicious. They are a perfect, fun finger food. They make a great Halloween appetizer.
Can I freeze Baked Cheese Mummies?
It’s best not to freeze them. The crescent roll dough can get soggy. They dry out easily. Freshly made is always the tastiest. Bake them right before your party or snack time.
Final Thoughts
Making these Baked Cheese Mummies is more than just cooking. It’s about creating memories. It’s about adding a little magic. These spooky snacks bring smiles. They are perfect for parties. They are also great for a fun family night. I love how simple they are. They prove that delicious food doesn’t need to be complicated. So go ahead and unwrap this treat!
Embrace the fun of Halloween. Let these cheesy delights be part of your celebration. They are a testament to simple joy. Enjoy every gooey, golden bite. Happy haunting and happy eating!
PrintBaked Cheese Mummies: Unwrap this Spooky Treat!
- Total Time: 27 minutes
- Yield: 8 servings
- Diet: Vegetarian
Description
These Baked Cheese Mummies are a fun and festive Halloween appetizer. Crescent roll dough is wrapped around cheese sticks to resemble mummies, then baked until golden brown and served with a marinara dipping sauce.
Ingredients
- 8 oz can refrigerated crescent roll dough
- 8 string cheese sticks, halved lengthwise
- 1 tablespoon olive oil
- 1/4 teaspoon black sesame seeds (for eyes)
- Marinara sauce, for dipping
Instructions
- Preheat oven to 375°F (190°C). Line a baking sheet with parchment paper.
- Unroll the crescent roll dough and separate it into 8 triangles.
- Cut each triangle in half lengthwise to create thin strips.
- Wrap each cheese stick half with the dough strips, leaving a small gap for the ‘face’.
- Place the ‘mummies’ on the prepared baking sheet.
- Brush the mummies with olive oil.
- Using the sesame seeds, create two ‘eyes’ on each mummy.
- Bake for 10-12 minutes, or until golden brown and the cheese is melted.
- Serve warm with marinara sauce for dipping.
Notes
- You can use any type of string cheese you prefer.
- For a different flavor, try wrapping the cheese in puff pastry instead of crescent rolls.
- Get creative with the ‘eyes’! You can use small pieces of black olives or edible candy eyes.
- Prep Time: 15 minutes
- Cook Time: 12 minutes
- Category: Appetizer
- Method: Baking
- Cuisine: American