Introduction to Pumpkin Cheesecake Truffles
Hello, fellow home cooks! Autumn’s arrival always brings a cozy feeling. It’s the season for warm spices and comforting treats.
I have a new favorite for you. It’s my Pumpkin Cheesecake Truffles. They are absolutely delightful. This recipe is a game-changer.
Busy days call for simple joys. These little gems are perfect. They’re a quick solution for a sweet craving. Plus, they’re a lovely way to impress guests.
You’ll love how easy these are. They taste like fall in every bite. Let’s create some magic together.
Table of Contents
Why You’ll Love This Pumpkin Cheesecake Truffles
These delightful bites are incredibly easy. You can whip them up quickly. They offer amazing fall flavor.
They are perfect for busy schedules. Impress everyone with minimal effort. Your taste buds will thank you.
Ingredients for Pumpkin Cheesecake Truffles
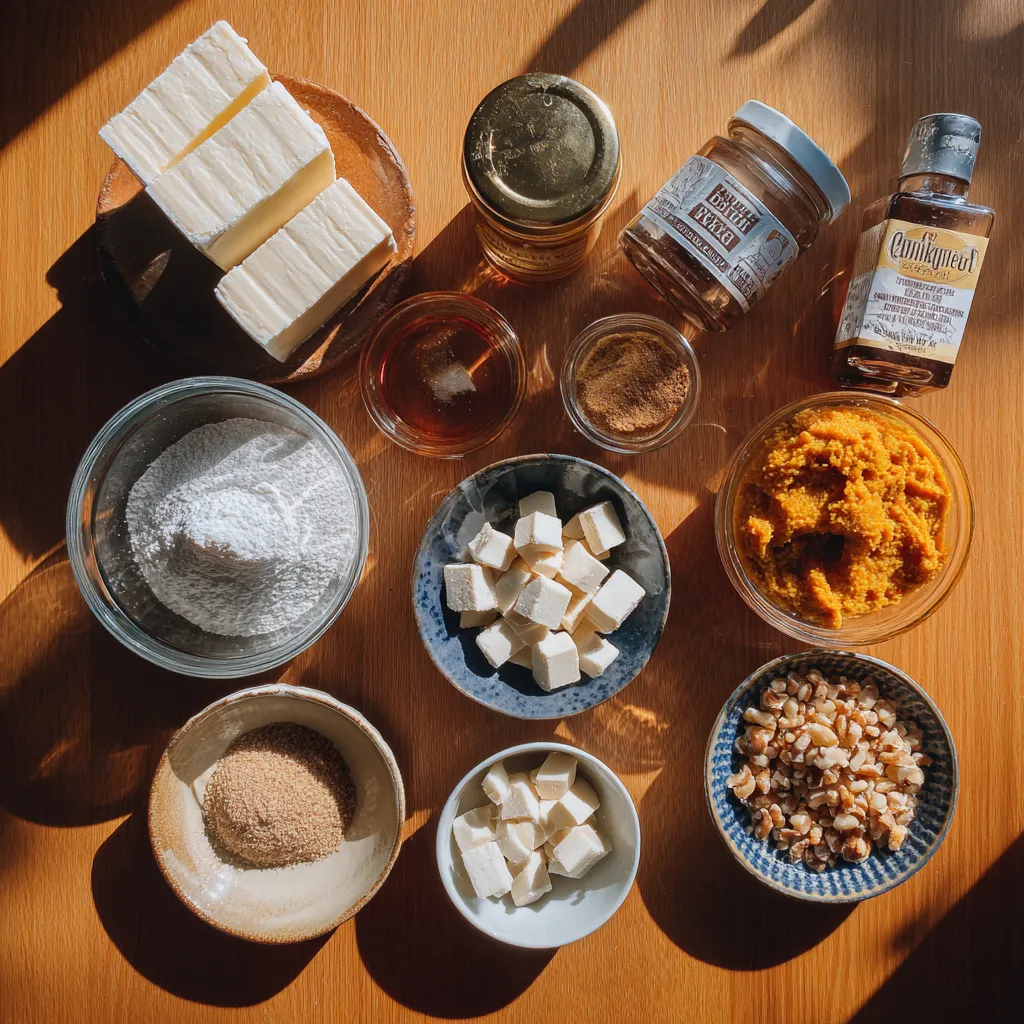
Gathering your ingredients is the first step. It makes the process smooth. You’ll find the exact amounts at the end. This list gives you a peek.
Think of them as your flavor building blocks. They come together beautifully. Let’s talk about what makes these special.
Cream Cheese
This is the creamy heart of our truffles. Use full-fat cream cheese. It should be softened completely. This ensures a smooth, lump-free base. It’s the backbone of our cheesecake delight.
Pumpkin Puree
Pure pumpkin puree is key here. Avoid pumpkin pie filling. That stuff has added sugar and spices. We want pure, unadulterated pumpkin flavor. It gives our truffles that lovely fall color.
Powdered Sugar
Also known as confectioners’ sugar. This sweetens our mixture. It also helps create that smooth, creamy texture. It dissolves easily. It’s the gentle sweetness we need.
Pumpkin Pie Spice
This is where the cozy fall aroma comes from. It’s usually a blend of cinnamon, nutmeg, ginger, and cloves. You can buy it pre-made. Or, you can mix your own. It truly defines the season.
Vanilla Extract
A splash of vanilla enhances all the other flavors. It adds a subtle warmth. It rounds out the spices beautifully. Pure vanilla extract is always best.
Salt
Just a pinch of salt works wonders. It balances the sweetness. It also makes the other flavors pop. Don’t skip it! It’s a flavor enhancer.
White Chocolate
This forms the luscious coating for our truffles. Good quality white chocolate chips or a bar work well. They melt beautifully. They create a sweet shell. It’s the perfect contrast.
Optional Toppings
Here’s where you can get creative! Crushed graham crackers add a nice crunch. Chopped nuts offer texture and nutty flavor. A sprinkle of cinnamon adds more warmth. They are fun additions.
How to Make Pumpkin Cheesecake Truffles
Now for the fun part! Let’s create these delicious Pumpkin Cheesecake Truffles. It’s easier than you think. Follow these simple steps.
We’ll transform simple ingredients into a fall delight. Get ready for some kitchen magic. It’s a rewarding process.
Step 1: Prepare the Cheesecake Base
First, beat your softened cream cheese. Do this until it’s perfectly smooth. This is our creamy foundation.
Next, add pumpkin puree. Stir in powdered sugar. Add pumpkin pie spice, vanilla, and salt. Beat everything until it’s well combined. It should be a smooth, dreamy mixture.
Step 2: Chill the Mixture
Chill this wonderful mixture next. Put it in the refrigerator. Let it chill for at least one hour. It needs to be firm enough to handle.
This chilling step is crucial. It makes rolling the truffles much easier. Patience is key here.
Step 3: Form the Truffles
Line a baking sheet with parchment paper. This prevents sticking. Now, roll the chilled mixture. Make small balls, about an inch wide. Place them on the prepared sheet.
Try to make them uniform in size. This helps with even coating later. They are starting to look like little pumpkin gems!
Step 4: Freeze the Truffles
Pop the baking sheet into the freezer. Freeze them for about 30 minutes. They need to be quite firm. This helps them hold their shape.
Freezing is essential. It prevents them from falling apart. They’ll be sturdy for dipping.
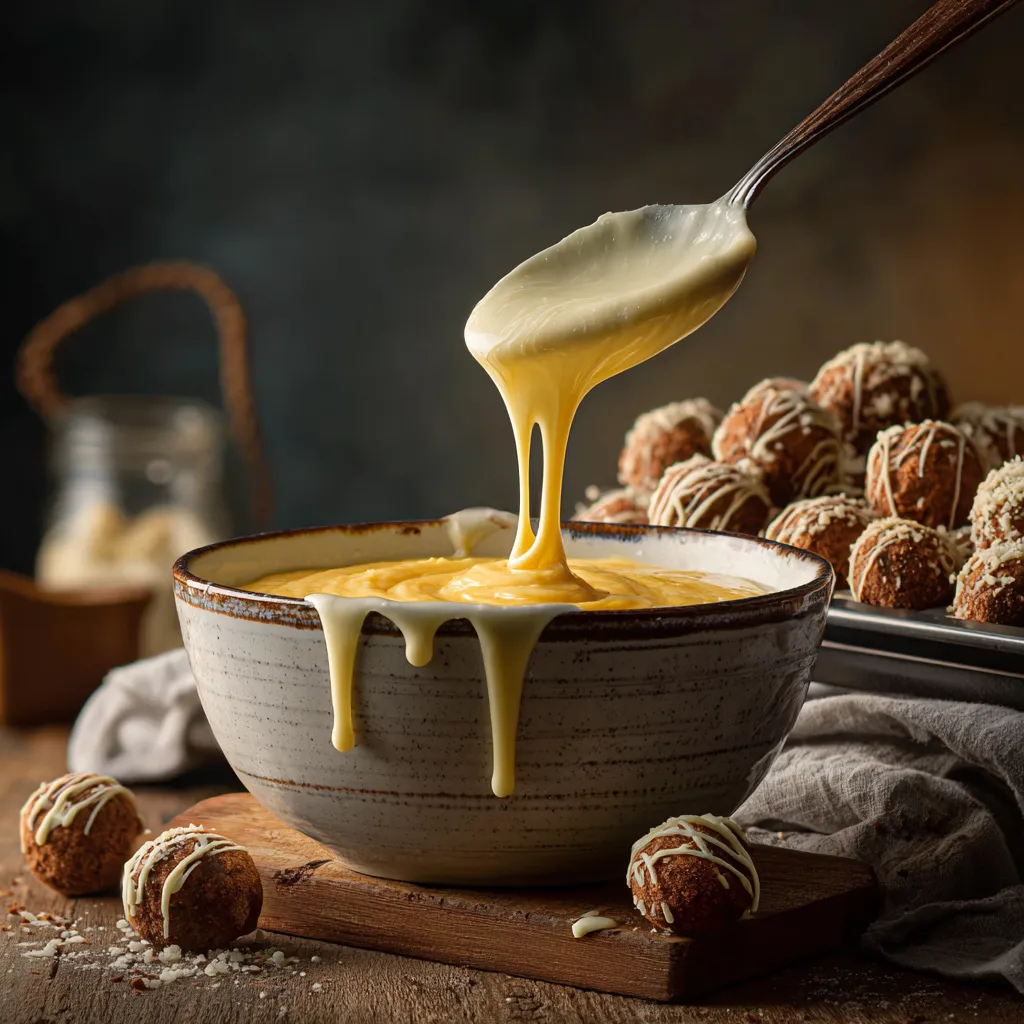
Step 5: Melt the White Chocolate
Melt your white chocolate carefully. Use a microwave-safe bowl. Heat in 30-second bursts. Stir between each interval. Or, use a double boiler for gentle melting. Watch it closely.
You want smooth, liquid chocolate. Avoid overheating it! This can make it seize up. A smooth melt is key for coating.
Step 6: Coat the Truffles
Dip each frozen truffle ball in the melted white chocolate. Use a fork or toothpick. Ensure it’s fully covered. Lift it out. Let the excess chocolate drip off.
Place the coated truffles back on the parchment paper. Work quickly before the chocolate sets. These are becoming beautiful Pumpkin Cheesecake Truffles.
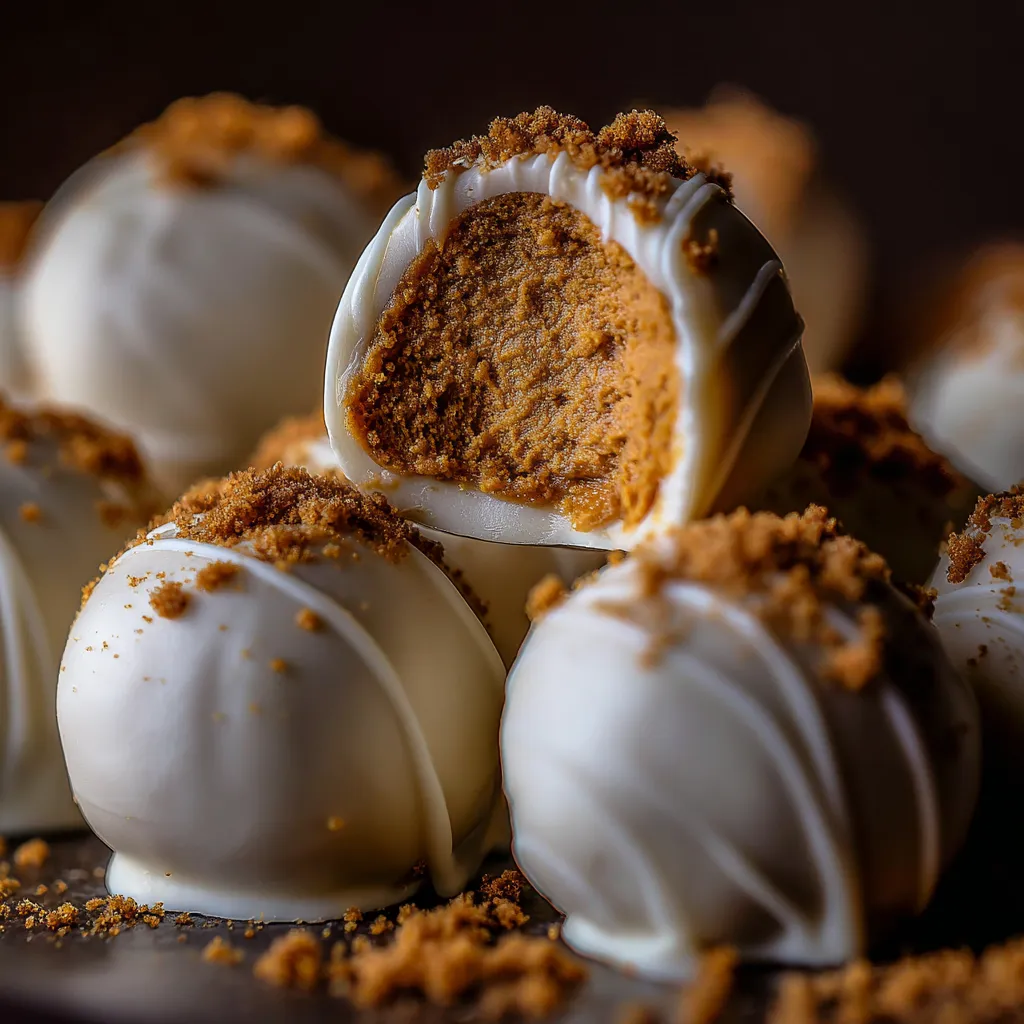
Step 7: Add Toppings (Optional)
If you’re using toppings, do it now. Sprinkle crushed graham crackers. Add chopped nuts or cinnamon. Do this while the chocolate is still wet. They’ll stick right on.
This is your chance to personalize. Get creative with textures and flavors. It adds another layer of deliciousness.
Step 8: Harden and Store
Put the baking sheet back in the fridge. Let the truffles chill for at least 30 minutes. The chocolate needs to harden completely. Then, store them in an airtight container. Keep them refrigerated. Enjoy your homemade fall treats!
Tips for Success
- Ensure cream cheese is fully softened. This prevents lumps.
- Don’t skip chilling and freezing steps. They are crucial.
- Melt white chocolate gently. Avoid overheating it.
- Work quickly when coating truffles.
- Store leftovers in an airtight container.
Equipment Needed
- Mixing bowls: Use any bowls you have.
- Electric mixer or whisk: A whisk works too!
- Measuring cups and spoons: Standard kitchen tools.
- Baking sheet: A cookie sheet is fine.
- Parchment paper: Wax paper is an alternative.
- Fork or toothpick: For dipping truffles.
Variations for Pumpkin Cheesecake Truffles
Once you’ve mastered the basic Pumpkin Cheesecake Truffles, why not play with flavors? These little bites are wonderfully adaptable.
Let’s explore some fun ways to switch things up. You can tailor them to your exact taste. Or, make them work for different needs.
Chocolate Variations
- Try milk chocolate or dark chocolate for dipping.
- Drizzle melted chocolate over the white coating.
- Use chocolate chips for a more rustic look.
Spice Adjustments
- Add a pinch of ground ginger or cardamom.
- Reduce the pumpkin pie spice if you prefer less spice.
- A tiny bit of nutmeg is also lovely.
Dietary Adaptations
- Use dairy-free cream cheese and white chocolate.
- For gluten-free, ensure your toppings are GF.
- Consider a sugar-free powdered sweetener.
Serving Suggestions
- Arrange on a festive platter.
- Pair with coffee or spiced cider.
- Offer them as a dessert for gatherings.
- They make a lovely edible gift.
FAQs about Pumpkin Cheesecake Truffles
Got questions about these delicious Pumpkin Cheesecake Truffles? I’ve got answers!
Let’s clear up any confusion. We want your baking to be smooth.
Can I make these Pumpkin Cheesecake Truffles ahead of time?
Yes, absolutely! You can make the truffle mixture a day in advance. Roll and freeze them too. Then, dip them in chocolate when ready. This is great for busy schedules.
What is the best way to melt white chocolate for coating?
Melting white chocolate needs care. Use a microwave-safe bowl. Heat in 30-second intervals. Stir between each one. This prevents burning. A double boiler also works well. Keep it gentle.
Can I use a different type of chocolate for these truffles?
Definitely! While white chocolate is classic, milk or dark chocolate work wonderfully. They offer a different flavor profile. Choose your favorite for coating these fall delights.
How long do Pumpkin Cheesecake Truffles last in the refrigerator?
These tasty truffles last about a week. Store them in an airtight container. Keep them in the fridge. They stay fresh and delicious.
Final Thoughts
There you have it! My Pumpkin Cheesecake Truffles are ready.
They are a true taste of autumn. These little bites bring so much joy. They are perfect for sharing.
Making them is a delightful experience. It’s a simple pleasure on a busy day. You’ll feel so accomplished.
Enjoy every single delicious bite. They are a sweet reward. Happy baking, everyone!
PrintPumpkin Cheesecake Truffles: Indulge in Delicious Fall Bites!
- Total Time: 2 hours 35 minutes (including chilling/freezing)
- Yield: Approximately 24-30 truffles
- Diet: Vegetarian
Description
These Pumpkin Cheesecake Truffles are a delightful and easy-to-make fall treat, perfect for any occasion. They combine the creamy richness of cheesecake with the warm spice of pumpkin, all in a bite-sized package.
Ingredients
- 8 ounces cream cheese, softened
- 1/2 cup pumpkin puree
- 1/4 cup powdered sugar
- 1 teaspoon pumpkin pie spice
- 1/2 teaspoon vanilla extract
- Pinch of salt
- 8 ounces white chocolate, chopped
- Optional: crushed graham crackers, chopped nuts, or cinnamon for rolling
Instructions
- In a medium bowl, beat the softened cream cheese until smooth.
- Add the pumpkin puree, powdered sugar, pumpkin pie spice, vanilla extract, and salt. Beat until well combined and smooth.
- Chill the mixture in the refrigerator for at least 1 hour, or until firm enough to roll into balls.
- Line a baking sheet with parchment paper.
- Roll the chilled pumpkin cheesecake mixture into small balls, about 1 inch in diameter. Place them on the prepared baking sheet.
- Freeze the truffle balls for about 30 minutes, or until firm.
- Melt the white chocolate according to package directions (you can do this in a microwave-safe bowl in 30-second intervals, stirring in between, or in a double boiler).
- Dip each frozen truffle ball into the melted white chocolate, ensuring it is fully coated. Use a fork or toothpick to help lift and drain excess chocolate.
- Place the coated truffles back on the parchment-lined baking sheet.
- If desired, immediately sprinkle with crushed graham crackers, chopped nuts, or cinnamon before the chocolate sets.
- Refrigerate the truffles for at least 30 minutes to allow the chocolate to harden completely.
- Store in an airtight container in the refrigerator.
Notes
- Ensure your cream cheese is fully softened for a smooth mixture.
- Don’t skip the chilling and freezing steps, as they are crucial for easy rolling and coating.
- White chocolate can be substituted with milk or dark chocolate if preferred.
- For a smoother coating, you can add a teaspoon of coconut oil or vegetable shortening to the melted chocolate.
- Prep Time: 20 minutes
- Cook Time: 5 minutes (for melting chocolate)
- Category: Dessert
- Method: No-Bake
- Cuisine: American